Mixing Synth Pop: Bass
In part two of this series about mixing Synth Pop, mixer/engineer Tristan Hoogland describes his processes for mixing bass.
Tutorial: Tristan Hoogland
Having explored techniques for mixing drums in part one of this series, let’s take a look at mixing bass. Synth Pop does a fine job of crossing genres so it’s not unusual to see deep bass lines, 808s, electric bass and more all in the same mix – but getting them to work together can take a bit of finessing. In this issue we’ll explore the various types of bass sounds commonly used in Synth Pop and some techniques to mix them, individually and together.
SUB BASS
This could be something like a Moog, which we want to feel ‘deep’ but we also need it to be perceived on smaller playback systems that don’t have great bass response. Getting the volume right of any deep bass line such as this (or an 808, as explained below) should be 90% of the work. I rarely EQ these except for removing noisy top end or excessive sub energy that might be eating up headroom. Rely on your fader position and using high pass filters to carve away unwanted low end from surrounding elements to create a large bottom end.
In terms of generating harmonics so it can be perceived on smaller systems, my favourite tool for this is Thermionic’s Culture Vulture, but Decapitator also works if that’s what you have. With Culture Vulture I’ll usually opt for setting T, or for P1 if I want to take it over the edge a little more. The bias control is incredibly useful for tuning the distortion to the signal; the deeper the signal the lower I set the bias, usually starting around three or four on the dial. I’ll start driving the signal until I hear it ‘fur’ up, then fine-tune from there. You don’t want it to sound like an overdriven guitar amp, just more like the original sound is gaining focus in the low-mids. When bypassed it should sound different, of course, but not in a clean vs metal-zone kind of way!
![[[01]]-pichi](https://www.audiotechnology.com/wp-content/uploads/2021/03/01-pichi.jpg)
808s
I might compress this to extend the tail if it’s decaying too quickly, or add distortion for harmonics. When I want more sustain my favourite tool is the Distressor, but any compressor will do. Starting with a ratio of 3:1, set a fast attack time (between one and three on the dial) to ensure consistency between each passing phrase, followed by a medium release set to taste (around 2.5 on the dial). The quicker the original sound’s decay, the longer the release you’re likely to use. Set the input so you’re seeing 8dB to 12db of gain reduction, so you can really hear it working. Don’t be afraid to dial in a faster attack time or a higher ratio to get it solid while you’re getting the release timing right. Bass comes to life with compression, and you want to aim for tone and a musical envelope. If it needs harmonics to cut through on smaller systems, apply the principles described above for sub bass.
![[[02]]-pichi](https://www.audiotechnology.com/wp-content/uploads/2021/03/02-pichi.jpg)
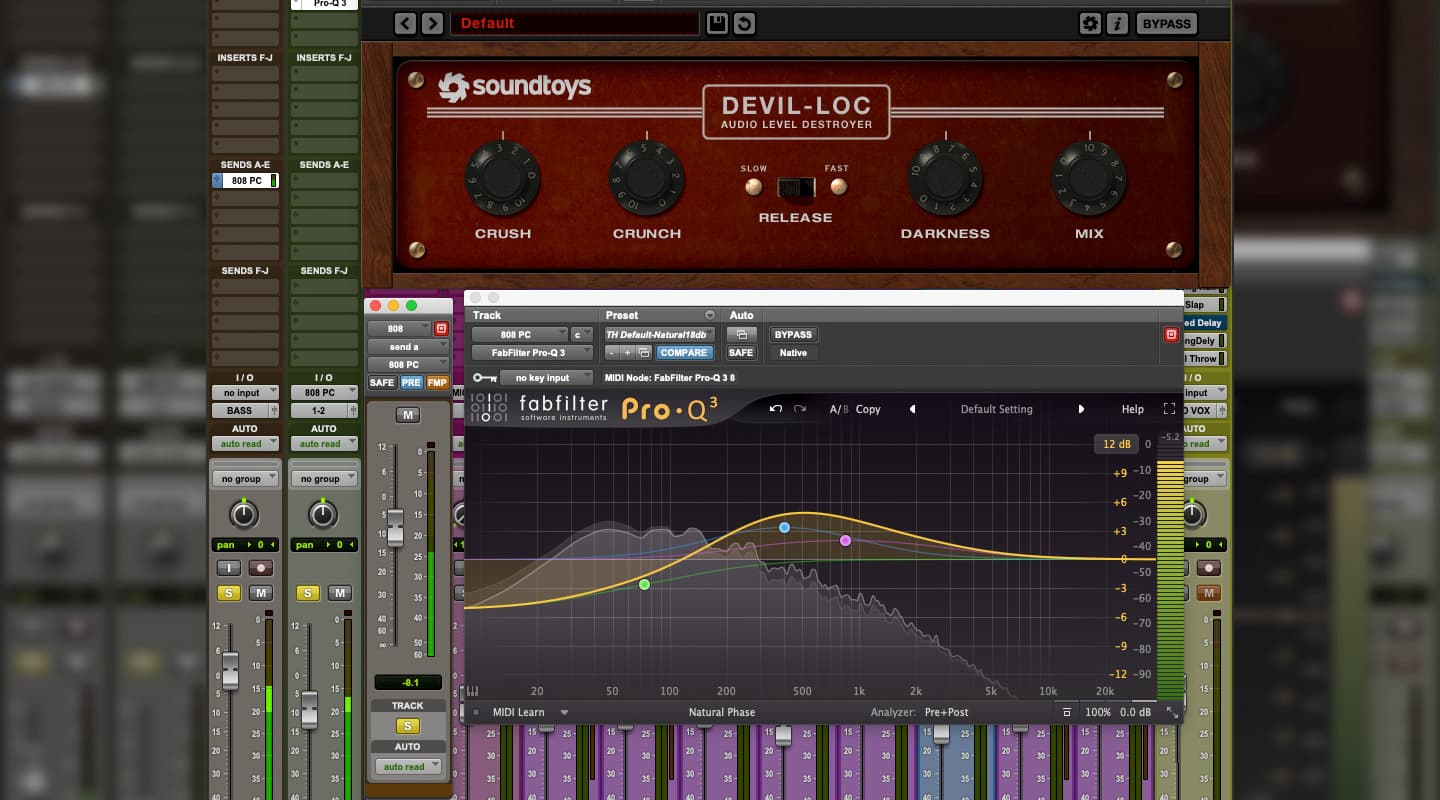
Sometimes you want to take it completely over the top and make it sound like a broken speaker. If so, Devil Loc is your one stop shop for obliteration. I’ll set this up in parallel with the clean signal and dial in both the Crunch and Crush until I’m getting a toneful and brickwalled signal (typically between three and five on both dials). Wind the darkness knob way down to around seven or eight to get rid of the ugly top end that will almost certainly be introduced. The signal will be very loud with these settings, so it’s worth placing about -15dB of trim afterwards so you can maintain finer fader resolution when blending. This is definitely a case of blend to taste, but if the effect is intentional you’re likely to end up with more of the obliterated signal than the original. You may also want to EQ the Devil Loc signal to emphasise the harmonics. (A caution about distortion! If you go too far you can end up with a fatiguing mix that won’t sound full range, so be sure to experiment with blending the clean and distorted signals together.)
![[[03]]-pichi](https://www.audiotechnology.com/wp-content/uploads/2021/03/03-pichi.jpg)
SWELLING BASS
Another bass sound you’re likely to come across is what can be best described as a deep, warm, sustained and moody bass that swells, usually found in sparse productions or sections of a song. With it swelling and wavering you’re going to have a hard time parking it in the mix.
If I just want to rein it in a little I’ll try something like an LA2A or a 33609 doing mild amounts of gain reduction, maybe 4dB to 6dB. If I’m looking to really solidify the passage I’ll begin with a low to medium ratio like 3:1, a medium to fast attack and a medium to slow release (around 250ms to 500ms). Set your input so you’re achieving around 10dB of gain reduction so you can really hear the compressor working, and tweak accordingly. With a slow release it’s not unusual to see the compressor working almost all the time so don’t be afraid if things are sounding good despite the meter jumping between 1dB and 12dB of gain reduction. For the track I was working on when I took this pic (‘Highway’ by Golden Vessel) things got a little thick in the 100Hz to 200Hz area after the compression, so I tucked that in and also reduced some top end because it was fairly noisy.
ARPEGGIATED BASS
You know the type – that fast-paced 8th/16th note (I love Juno 60s for this). In a sparse arrangement these are usually fine on their own except for removing any excessive low end energy that’s making it feel sluggish. If so, set your high pass filter up to around 300Hz and slowly bring it down again until you get back the low end you’re after – which could be anywhere between 40Hz to 150Hz depending on the other elements in the mix. If you have a lot of low end elements, you may need to park this high pass filter up around 150Hz to 200Hz.
In a dense mix I’ll opt for Avid’s Lo-Fi or Nembrini’s LoFi Vintage Clipper to fatten it up and cut through the mix. Drive the distortion knob to the point where the meter is basically pegged, at which point we have 90% of the sound. Sometimes the distortion brings out a lot of harshness so you may want to experiment with a low pass or attenuating some upper mids (2kHz to 4kHz). Again if there are a lot of deep notes in the passage causing problems in the low end, work that high pass filter! While I don’t often use effects on bass, a pitch shift can create a nice stereo spread. In this instance I used MicroShift with Style setting two, but I also removed a lot of low end to keep clear of the dry signal and focus the effect in the midrange.
![[[04]]-pichi](https://www.audiotechnology.com/wp-content/uploads/2021/03/04-pichi.jpg)
![[[06]]-pichi](https://www.audiotechnology.com/wp-content/uploads/2021/03/06-pichi.jpg)
![[[05]]-pichi](https://www.audiotechnology.com/wp-content/uploads/2021/03/05-pichi.jpg)
![[[07]]-pichi](https://www.audiotechnology.com/wp-content/uploads/2021/03/07-pichi.jpg)
![[[08]]-pichi](https://www.audiotechnology.com/wp-content/uploads/2021/03/08-pichi.jpg)
ELECTRIC BASS
If an electric bass is included it’s usually playing more of a rhythmic and melodic line whilst the deep sub bass holds down the low end. In that case, with both bass lines playing at their respective volumes, start with the electric bass’s high pass filter up around 400Hz and then bring it down until the low end starts to sound blurry or is encroaching on the sub bass. In the example shown here, for the track called ‘Live Bass’ I arrived at around 100Hz, but then boosted around 150Hz to restore some of the low end character that was reduced by the high pass filter. With that locked off it’s time to find some areas to enhance the melodic parts. As you can see I’ve boosted around 500Hz and a lot of 1.5kHz to feature it further up in the spectrum. Electric basses often benefit from compression and on this one, because it was quite melodic, I wanted to keep it locked down. The SSL Channel is set with a fast attack and a moderate release of 150ms. This was followed by the Waves L2 just taking care of any rogue peaks that got past the compressor.
![[[09]]-pichi](https://www.audiotechnology.com/wp-content/uploads/2021/03/09-pichi.jpg)
LAYERING
When dealing with layered bass lines, start by establishing where each bass line will live in the spectrum because this will inform your EQ decisions. A useful guiding principle is that if it’s deep and/or has a lot of sustain it should go low, while if it’s melodic and rhythmic it will benefit from living higher up in the spectrum. My first line of defence in this situation is EQ, specifically high and low pass filters. First create a working balance between the elements, then start with a high pass filter set around 300Hz for the higher sound and begin backing it off until you feel the low end start to bloat. This could be anywhere between 80Hz and 300Hz, depending on the sound.
In this example I’ve high passed the Hi Synth Bass (grey spectrum curve) at 260Hz, keeping the low end clear for the Sub Bass (red spectrum curve). Don’t be alarmed if bypassing the EQ makes it feel weak, because we’re actually correcting a problem that should have been dealt with earlier in the process. Conversely, the bass holding down the bottom end may benefit from low pass filtering (or reducing the sample rate in Avid’s Lo-Fi) to draw focus to the low end and keep the top end clear for the upper bass. It’s nice to have each layer working well together but also contrasting, so if any one bass sounds similar to another don’t be afraid to experiment with distortion or crazy EQ curves to make a point of difference.
![[[10]]-pichi](https://www.audiotechnology.com/wp-content/uploads/2021/03/10-pichi.jpg)
IT DOESN’T HURT TO LOOK
What makes the bass elements in a mix different to upper register instruments is that even in a well-designed and spec’d out room it’s hard to hear it accurately – especially the deep bass lines we deal with. Therefore it’s important to establish other techniques for assessing the low end. I use some meters and analysers to help me out, including ProTools Meter (in sample peak mode), Waves VU Meter, and the FabFilter Q3 Analyser. These can be useful for ensuring you have a consistent bottom end when you have different bass lines for different sections (e.g. an 808 in the chorus and a Moog in the verse). If I push up a bass element and see either a VU or ProTools meter jumping about hysterically I know that it might need some attention. What I’m looking for is the meter to be relatively consistent between notes. I prefer the ballistics of an outboard VU meter over a plugin meter, but Waves VU Meter is pretty decent if you’re looking for an alternative in-the-box.
The FabFilter Q3 analyser helps you to spot excessive low end in things that don’t need it, and confirms suspicions of things that should and should not have low end. It’s also useful for identifying the causes of masking that might be occurring between elements. It’s important to note that you shouldn’t go blindly making EQ decisions based on what you’re seeing, but checking in won’t hurt.
SIDECHAINING
Sidechaining is the last thing I do in a mix. I don’t use it as a means to solve a problem, but as an effect. I use VPS Multiband Sidechain 3 because it works around the delay compensation issue in ProTools, but any compressor will work. It should be last in the chain. There are two types of sidechaining that are frequently requested: quickly pumping the mix when the kick hits, and ducking and rising over the beat or bar.
Send either the kick or a trigger file to a bus that you can assign to your compressor’s sidechain input (in VPS, use the transmitter). You want to use a fast attack time (0.1ms or faster) and a medium ratio of 6:1 with the release time based on the desired brief (as described above). If it’s pumping the mix too quickly in an energetic way, a release time of 50ms to 100ms is fine. No need to stress about nailing the divisible beat for this one, you just want the effect of getting in and out quickly. Wind back the threshold so that you’re getting around 15dB of gain reduction and tweak from there should you want less or more. If you want more, wind back the release so that the compressor is fully open just before each downbeat. Using BPM-to-millisecond calculators can be helpful here, but I prefer doing it by ear.
![[[12]]-pichi](https://www.audiotechnology.com/wp-content/uploads/2021/03/12-pichi.jpg)
![[[11]]-pichi](https://www.audiotechnology.com/wp-content/uploads/2021/03/11-pichi.jpg)
That wraps things up for this installment. In the next issue we’ll change gears and delve into the atmospheric world of mixing synths!


RESPONSES