Mixing Synth Pop: Drums
In Part One of this series about mixing synth pop, mixer/engineer Tristan Hoogland describes his process for mixing drums.
Tutorial: Tristan Hoogland
Having started out working in the pop and rock genres with guitar bands such as Ball Park Music, Fountaineer and many others, my first foray into the synth pop and electronic music realm was anything but smooth. The usual tricks and techniques I used for pop and rock music no longer worked, and it took a while to appreciate that the sonic palette was completely different and to align my hearing accordingly. I hope this series provides some insights into the general philosophies and techniques that go into making this music pop!
DRUMS: LAYER UPON LAYER
In synth pop the drum elements are often comprised of various individual layers. It’s not uncommon to receive numerous kicks, snares, claps, fingersnaps and hi-hats – not to mention anything else that may exist. Just like having multiple mics on a single source (e.g. a kick in and a kick out), each track contributes a small part to the final sound and it’s our job to make them all work together.
In terms of the overall presentation of the drums, the kick is generally quite prominent with a focus in the low end and low mid area; think in terms of ‘knock’ and ‘thud’. Snares, claps, and fingersnaps tend to be ‘crispy’ rather than ‘fat’ and ‘cracky’, and hats are ‘thin’ rather than ‘chunky’ and ‘cutting’. It all depends on the arrangement, of course, but broadly speaking I’ve found the above to be true.
IT’S ALL ABOUT THE BALANCE
Start by pushing up the faders one by one, keeping a mental note of anything you might notice as you stack up the sounds. I’m usually keeping an eye out for anything that’s bloating the low end with the kicks, and anything that’s making the upper mids feel harsh with the snares, claps, percussion and hi-hats. Your first impression is usually right; if you feel like there’s anything you can address straight away that may be a problem later, I’d encourage you to deal with it then and there.
PHASE & TIMING
I spend a lot of time tinkering with the polarity and timing of the samples. Don’t just import stems then stack ‘em up and go, because it’s not uncommon for similar elements to audibly arrive later or earlier than one another. It might be that a sample has a 2ms gap at the start, or it was played in live with natural timing variations.


Start by identifying the main layer of each sound and get it in positive phase (meaning that the initial transient moves upwards/positively), then manually align the remaining tracks by hand. Next, establish a coherent phase relationship. One by one invert the phase of each track against the main layer, listening for the setting that provides the most focused sound.
For advanced polarity correction I use UAD Little Labs IBP Phase Alignment Tool, which continuously varies the phase between 0 and 180 degrees. Aligning the tracks, adjusting the phase and/or inverting the polarity can make for a night-and-day difference. Be sure to use your discretion when aligning tracks, however, as it may be the producer’s intention for them to land slightly differently.

EQ: THE ART OF CRAFT
EQ is a powerful crafting tool when attempting to make multiple sound elements work together as one. I tend to reach for subtractive EQ rather than additive EQ, with the goal of making space in one element for the other elements – especially when there are so many to fit in. Don’t be alarmed if you find yourself getting heavy handed; the more layers you have in a sound, the more EQ you’re likely to use to make them all fit. I’ll start with a medium to narrow Q and sweep through the areas of a track that I feel have excessive energy and are masking other tracks or distracting me from what I want to hear most in the sound, and reduce those areas accordingly.
KICKS: SCHOOL OF HARD KNOCKS
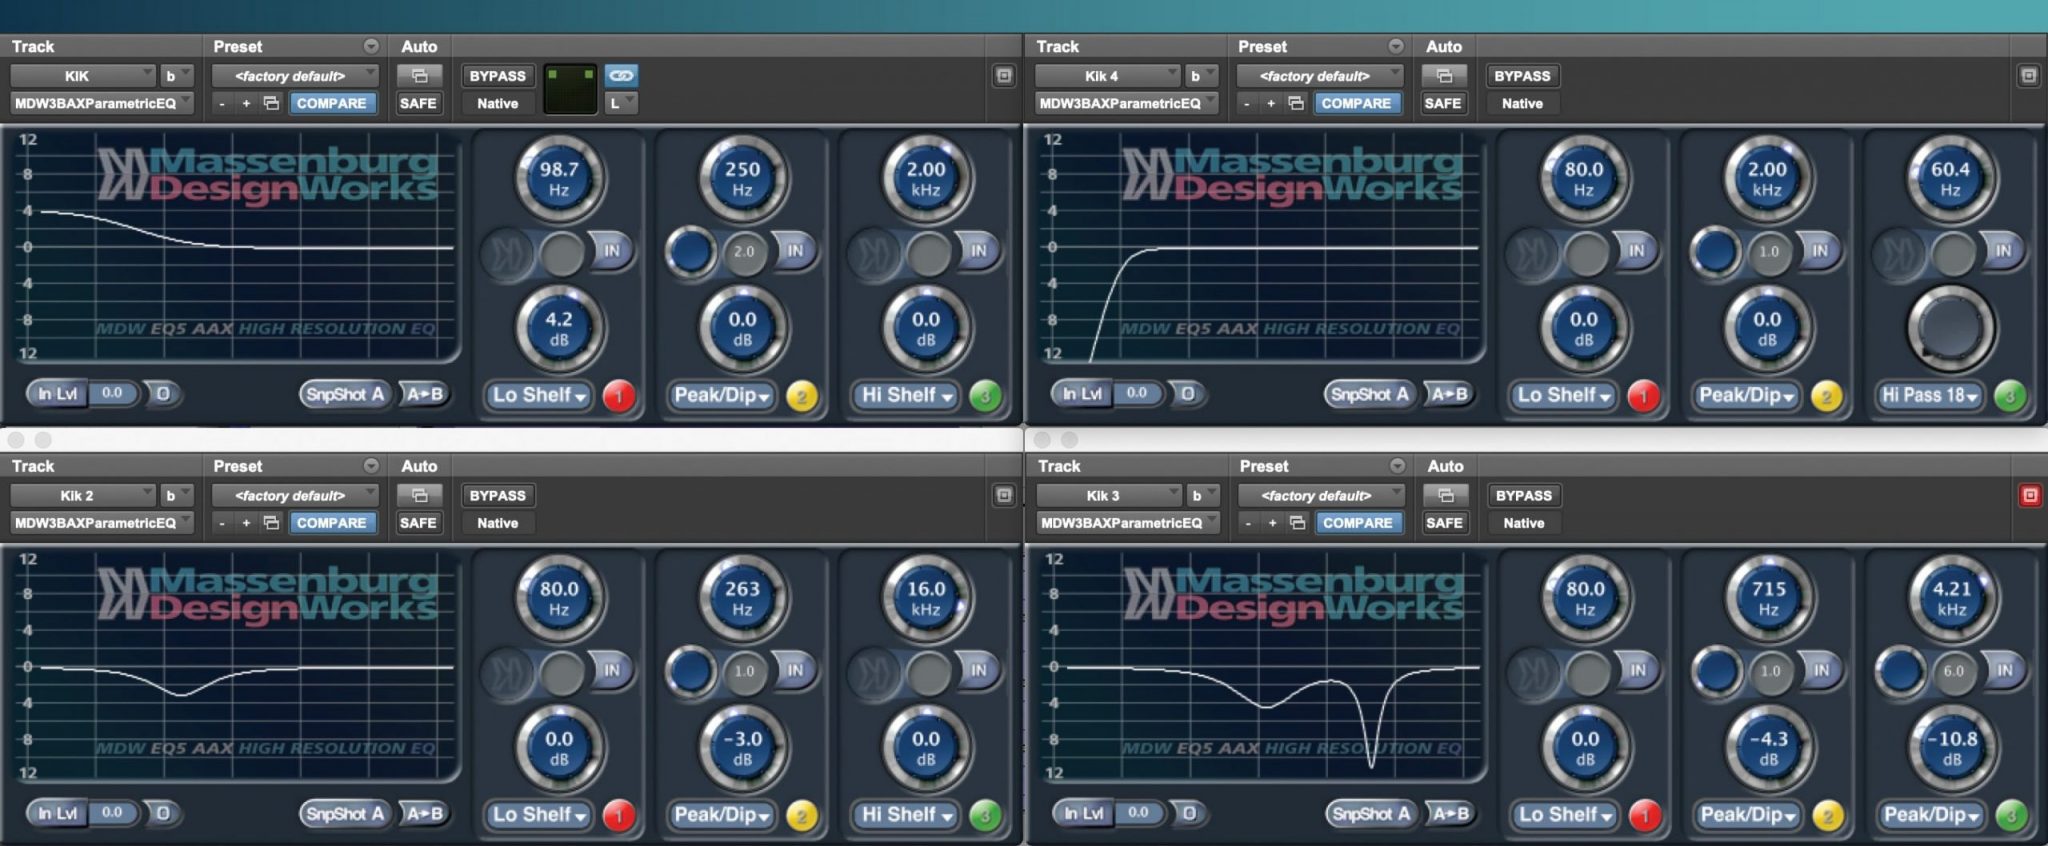
Kicks in synth pop music tend to favour ‘knock’ over click and sub, so I’m usually looking to reduce ‘pointiness’ (2kHz to 5kHz) and careful not to take away too much low mids (180Hz to 400Hz). In the example shown here I’m reducing 4.21kHz by -10.8dB and 715Hz by -4.3dB (bottom right), with a +4.2dB shelving boost at 98.7Hz on the kick buss (top left). Clickiness in the upper mids can usually be removed using a very tight Q without significantly altering the overall tone. You’ll notice I’m not adding any upper mids or top end on these EQs because I’m wanting to focus on the low end and low mids to get that ‘knock’.
I’ll do quite a lot of this work first on some smaller speakers, like Auratones or NS10s, and then switch over to the main monitors to make sure I’m not overlooking anything in the low end. Some samples will have a lot of resonance and bloom that will muddy things up or be out of tune with one another. I’ll experiment with high pass filters, sweeping all the way up to 200Hz on each sample just to see how much clearer I can get the low end, and then start parking it in a more reasonable spot (anywhere between 30Hz and 120Hz). Tip: FabFilter’s Q3 can be good for helping you ‘see’ the low end, and also for overlaying each track to see if you’re getting any excessive overlap between samples.
Another handy tool for shaping the low end is a transient designer. My favourite is iZotope’s Neutron Transient Shaper. The multiband option allows you to tighten the low end without affecting the rest of the spectrum. Setting the crossover between 80Hz and 180Hz can really help fine tune the ‘knock’ in the above band without adding a lot of crazy sub and bloating the low end.

SNARES, CLAPS & FINGERSNAPS
Snares and claps tend to build up in the mids and upper mids, resulting in unwanted honkiness and harshness. I spend a lot of time managing two areas in particular: 600Hz to 1kHz, and 2kHz to 5kHz. I rarely boost, except to add a top end bump if I feel like the cuts are creating a loss of overall presence.
One of my favourite techniques is using Lo-Fi (part of the D-Fi suite in Pro Tools) on uninspiring or ‘pointy’ percussion that lacks body and fullness, such as fingersnaps or claps. Simply wind up the distortion to taste and you’ll be surprised by how full the sound becomes without any other processing.

HATS
Similar to snares, I find in order to get them all working well together I need to make cuts in the higher end of the spectrum, generally the 3kHz to 6kHz area. I’d also recommend experimenting with Lo-Fi, bringing down the sample rate and anti-aliasing sliders because they can help make the hats more present in the mids and far less thin and pokey.
VINYL SAMPLES, iPHONE RECORDINGS & LO-FI DRUMS
Flavour tracks such as iPhone recordings and vinyl rips of live-played drums often make appearances in electronic music, but they need a lot of work to sit. I aim to have them sit in the mid range and leave the top and low end for the samples. Therefore I’ll start by setting a high pass filter quite high up to remove any unwanted rumble; it may end up as high as 300Hz. Old vinyl and iPhone recordings usually have more noise rather than musical top end, so I’m not afraid to be low passing down to 6kHz or lower if need be. You can automate these settings depending on how dynamic the arrangement is; for example, open them up if the rest of the samples disappear for a few bars. If it’s a complicated stem with a full kit I might use a dynamic EQ or multiband compressor, mostly just to keep the hi hats and snares in check.

PARALLEL LINES
One of the struggles I first had mixing electronic drums was getting them to have impact. My tricks from the days of mixing rock bands, such as parallel compression, didn’t cut it – things would just get louder, not bigger. I discovered that introducing distortion in addition to compression would pay dividends. My philosophy is that the compression adds ‘smack’ and keeps the drums solid, while the distortion helps them cut and adds aggression. (As a preface to the following, I rarely use compression on individual tracks. If hits are seemingly inconsistent, and assuming they’re samples, I’ll manually correct them with clip gain or automation. Beyond that, I’ll resort to saturation tools such as Lo-Fi on a case-by-case basis, and achieve the rest with parallel compression.)
Here’s how to do it. Start by creating three auxiliaries. The first will be our Drums Submaster, which we’ll route all the drum elements through with zero processing. The second aux will be for parallel compression, and the third for parallel distortion.
Establish the required start balance by adjusting the amount of each drum element that is sent to the Drums Submaster. Now send each individual track to the second and third auxiliaries respectively and set them to post-fader. Sending them discretely like this offers the freedom to not only drive more or less of each element into the parallel processing, but to have control if any one element is being brought too far forward or not forward enough.
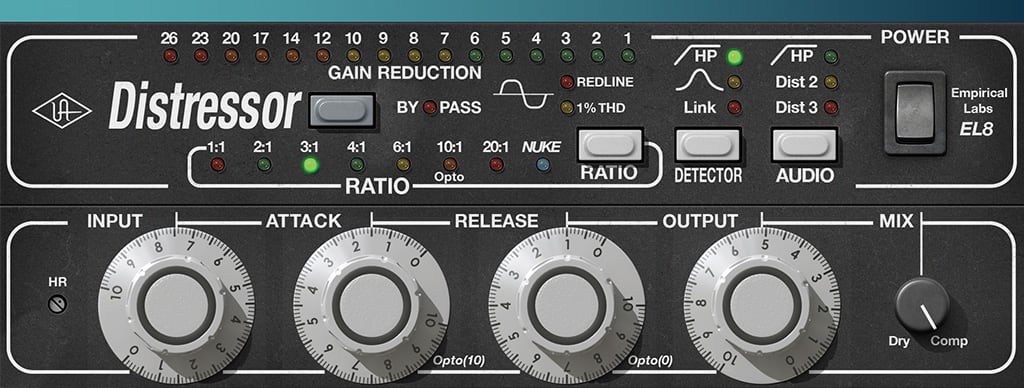
Getting the parallel compression to work is straight forward. I usually opt for a Distressor with a medium ratio (around 3:1) along with a fast attack and fast release so it’s working quite hard – I aim to see 10dB to 12dB of gain reduction. The Distressor’s meter is quite reliable, and I expect to see a similar amount of gain reduction on each major transient event. If one or two elements are driving it less or more than the others then I know that my fader balances and/or EQ need revisiting.
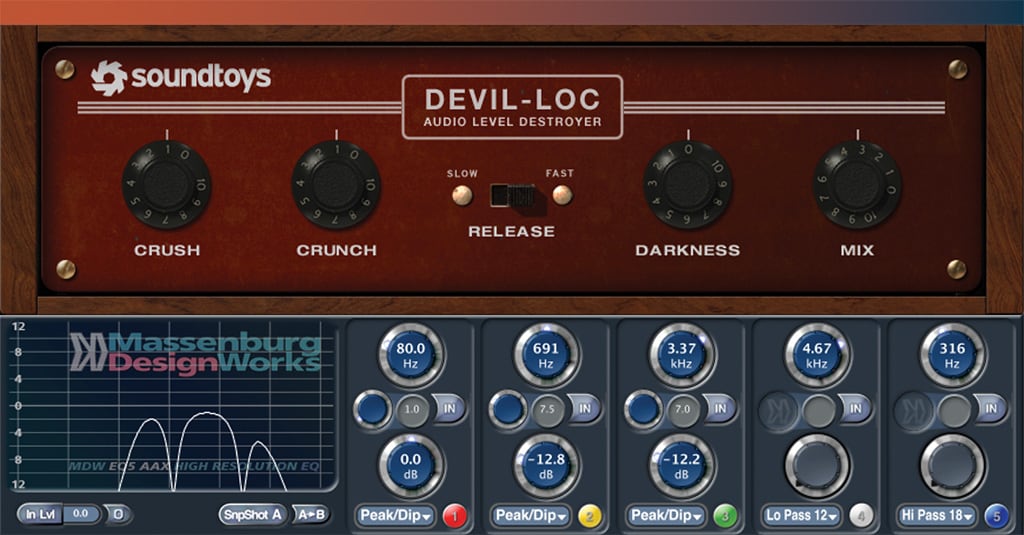
For the distortion I use Soundtoy’s Devil Loc, or sometimes UAD’s Thermionic Culture Vulture. I always set the Devil Loc to Crush = 3, Crunch = 3, Release = Fast, Darkness = 2.5 and Mix = 10. The Devil Loc is an abusive unit and the trick to getting it to work is to have control of the level you’re driving into it. I’ll either assign a master fader to the bus or place a trim plugin before the Devil Loc so the individual sends can always be parked at 0dB. Starting with the fader or trim control all the way down, slowly turn up the signal going into it until you find the sweet spot – which I usually find to be quite low!
Now blend the returns of the two auxiliaries (parallel compression and parallel distortion) in with the Drums Submaster to taste. If things are feeling too harsh back off the Devil Loc return. I typically end up with a fairly even amount of each, but if the source material is lacklustre I might end up with more Devil Loc. Once you’ve learned how to dial these in – particularly the Devil Loc – you won’t mix drums without them again!
EFFECTS
Unless effects are printed with the sample my advice is don’t bother adding them. With electronic music, and especially with drums, you’re going for immediacy. Adding reverb will smear the transients and set things back rather than forward. I can also guarantee that it’ll be the first thing your client asks you to remove!
UNTIL NEXT TIME…
Hopefully the techniques mentioned here have armed you with some ideas for your own projects. Try implementing one or two into your existing workflow, such as experimenting with parallel processing or parallel distortion instead of in-line processing, and see how it works for you. The palette is always changing, but developing some tools and techniques that create a level of predictability in your workflow is one of the key things in mixing. Besides that, anything goes!




RESPONSES