On The Bench: DIY Monitor Controller
If your studio monitoring is currently managed by something you inherited from your brother’s ’80s Dick Smith hi-fi, isn’t it high time you faced the music and found a more accurate means of listening to your system?
Text: Rob Squire
In amongst the seemingly infinite variety of audio gear that’s available to improve your life in the studio, there’s one item that’s often overlooked. It’s not the latest ‘vintage’ microphone or that cutting-edge sound polishing plug-in. Rather, it’s like many things that escape our attention in life – something quite simple. This device is usually found firmly planted right between our recording or mix platform and the speakers. It’s the humble volume controller.
Historically, the studio speaker volume control was part of a set of monitoring controls found smack bang in the centre of a large-format mixing console, which invariably formed the hub of every professional studio. Then, as new methods of recording and mixing, aided by changes in technology, shoved the traditional mixing console out the door (with some help from able bodied volunteers), the essential volume control disappeared along with it. However, being able to control the volume of studio loudspeakers isn’t something fashion or technological advancement should have much influence over. Everyone who listens to speakers should be able to control his or her volume regardless of the studio setup, to say nothing of the other handy functions often found in console monitoring control sections – such as selecting a variety of sources, potentially a couple of different sets of speakers and facilities like mono-ing and muting.
So in this final instalment of On The Bench for 2010, I thought it high time we heated up the soldering iron, designed and built our own monitor controller, and for a modest outlay and some effort, put together something that suits our requirements that’s of a high technical performance and quality. Since the monitoring control generally sits across the path of your entire means of hearing what you’re doing, it doesn’t make a lot of sense to skimp on this device.
If you currently find yourself reaching over to a tiny knob on your multi-purpose audio interface or nudging a virtual fader with a mouse to turn the speakers up and down, this DIY article is for you.

FIRST PRINCIPLES FIRST
It’s often the case with audio design that the simplest solution is the best, and this is certainly the case when it comes to monitor volume control. The simplest way of controlling the volume of a pair of speakers, whether they be passive speakers running off a power amplifier or a pair of self-powered monitors, is to use a passive attenuator. The advantage of this is two-fold. Firstly, there are no electronics involved – due to the complexity of active circuitry significant attention to design, choice of parts and powering would otherwise be paramount. Secondly, a passive control is very easy to construct. This makes it a simple and safe DIY project. Probably the biggest decision you’ll have to make during the course of its construction is what type of case to put it in, and how funky you want the master control knob to be. If you can solder well enough to make cables, you can make a passive monitor volume control.
The basic passive attenuator is formed around a potentiometer (pot) and for stereo this will consist of a dual-gang potentiometer. These can be purchased for as little as $3 from an electronics parts shop. Rotary switches can also be utilised to create an attenuator, however, being a switch, the final volume control is not continuous but rather, moving in discrete jumps as the switch is rotated through its positions. Readily available and affordable switches that could be used for a stereo signal have a maximum number of six positions, which really isn’t enough to give the range and incremental steps required for speaker volume control. 23-position switches get close to giving you the control required but these are very expensive and less readily available. The approach for this project will therefore be to use a pot, with the recommendation that, while you can experiment with the $3 part, ultimately you should lash out and purchase a very high quality pot.
Currently there’s a particular Alps brand pot available from RS Components that retails for just over $50 (www.australia.rs-online.com part number 219-9130) that’s of a very high quality. The fundamental thing gained by spending the extra $47, besides reliability, is the accuracy of the tracking between the two sections of the dual-ganged pot. With one section handling the left audio signal and the other handling the right, it’s pretty important that at all positions of the left audio signal match that of the right. While Alps quotes a maximum error of 2dB between the two gangs, I’ve found in the dozens of these pots I’ve used that the error is in fact less than 1dB and usually less than 0.5dB over most of its range. This is very good!
CUTTING TO THE CHASE
Here’s the schematic for the passive volume control.

In the diagram above you’ll see that four 4K7Ω (or 4700Ω) 1% metal film resistors and a dual-gang 10K log pot have been used to create the volume control.
Below is a photo of one of these wired up.
The combination of the two fixed-value resistors wired between the inputs and the pot form the attenuator. Technically, this is a variable pad and with the pot rotated fully clockwise for maximum volume it will still attenuate the signal by around 6dB. This is not a problem, however, and in fact generally speaking we want to throw away quite a lot of level between the output of a typical recording system and the speakers. If you’re operating your system at healthy professional levels as has been discussed a few times now in AT, your average signal level will be around the same mark as the maximum level that amplifiers or self-powered monitors will accept before clipping. By that I mean; the average level will be running the amp/speaker combination flat out and as loud as they’ll ever get. You’ll be wanting to turn it down, and turn it down by quite a bit!
THE DOWNSIDE
Is there a downside to this design? Sure. There’s no free lunch in electronics design, and good design balances these compromises in a sensible manner. The only practical issue with a passive design such as this one is the potential for high-frequency loss should very long cables be used between the output of the volume control and the amp or monitors. Having said that, in practice, for cables less than 10m long you’ll have a volume control with a frequency response from DC to over 50kHz and more headroom and a lower noise floor than anything you’ll hope to own that you can actually attach to either end.
Also, if you’re keeping count you’ll notice that the schematic doesn’t mention the signal ground wire, just the hot and cold wires. In this design all the ground wires simply join together in the monitor controller but not to anything else. While this design is balanced in and out, it will work with unbalanced equipment. However, unlike the beauty of a fully balanced system, it requires more attention to the manner in which the external equipment and connectors are wired together to avoid hum. In particular, ensuring all equipment is powered from the same mains outlet and that all the audio cable connectors have their shields connected.


BUT WAIT, THERE’S MORE
While a means of reliably, conveniently and accurately controlling the studio speaker volume is pretty fundamental, that isn’t the end of the wish list for most people. So while our soldering iron is still hot, let’s look at what other functions we might add to this basic volume controller to make it a more powerful tool in the studio. As it turns out, many of the other functions we might expect to see on a typical monitor controller – phase flipping, mono-ing, muting etc – are really just about signal routing and switching audio signals around. Once again, this is easily achieved passively, only this time using readily available switches rather than pots.
The switch I’ll focus on here is a rotary switch, meaning that you turn it to select different functions. Just like the volume pot, a rotary switch also accepts a knob so you can mix and match the styling of the knobs for these switches with the volume controller to suit your studio vibe. There are two types of readily available rotary switch: the open style ‘wafer’ switch and the sealed type. I prefer the open style switch available from Altronics myself. These yield a satisfying positive ‘click’ as they’re rotated from one position to another, and have large tags for easy soldering. Such rotary switches are available in a combination of possible positions selected and number of poles or individual signals that can be dealt with in the one switch. This combination of poles and positions always equals 12. Thus you can have a two-position switch with six poles, a three-position switch with four poles, a six-position switch with two poles etc. As we’ll see, a three-position switch with four poles is going to be pretty handy for most functions needed on our new masterpiece.
Let’s chip through the possibilities and examine how each one is wired shall we?
SOURCE SELECT / MUTE
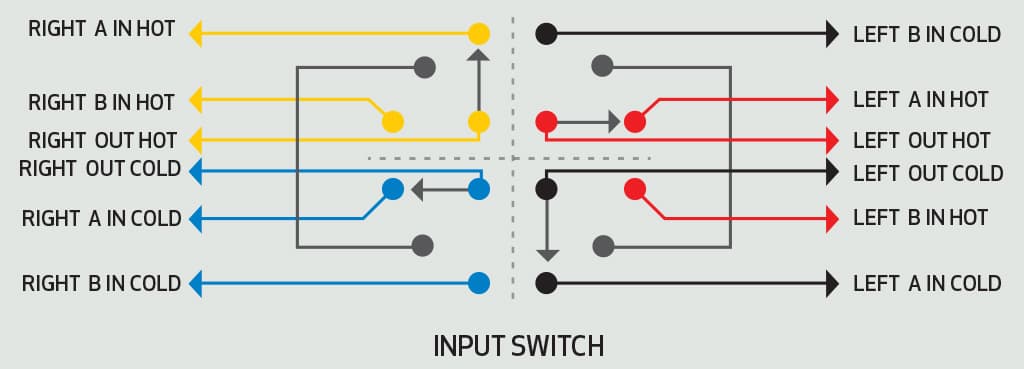
To have left and right balanced audio being selected requires a four-pole switch. This means we have three positions available and can thus select one of three inputs. In this example I’m selecting between two different inputs at the extreme switch positions (let’s call these positions A and B) and placing a Mute facility in the middle position. This allows the monitoring to be muted within one switch position whenever either A or B inputs are being monitored. In a practical setting the A input could be your master stereo bus and the B input an external source such as a CD player. The switch wiring scheme thus looks like this:

OUTPUT SELECT
Once again, to deal with stereo balanced audio requires at least a four-pole switch. This would allow up to three different pairs of monitors to be selected. In the example below I’ve used a six-pole switch to select just two different pairs of monitors and simply disregarded or not used two of the poles.

STEREO, MONO, PHASE REVERSE
There are many other facilities we could put on our master monitor controller. For instance, having stereo, mono and phase reverse functionality available when monitoring a mix is ‘handy’ for some engineers and ‘crucial’ for others, particularly mastering engineers. As well as normal stereo operation, the ability to mono the stereo signal (where left and right are mixed together and sent to both left and right monitors), and phase reverse the left and right channels and listen to this combination in mono, can provide all manner of information to an audio engineer. Reversing the phase of the right channel and mono-ing it with the left and sending the result to both speakers is particularly useful for assessing the width content of your mix and distortion characteristic by effectively replacing the ‘centre image’ with the out-of-phase information. This is how such a switch is wired:

BRINGING IT ALL TOGETHER
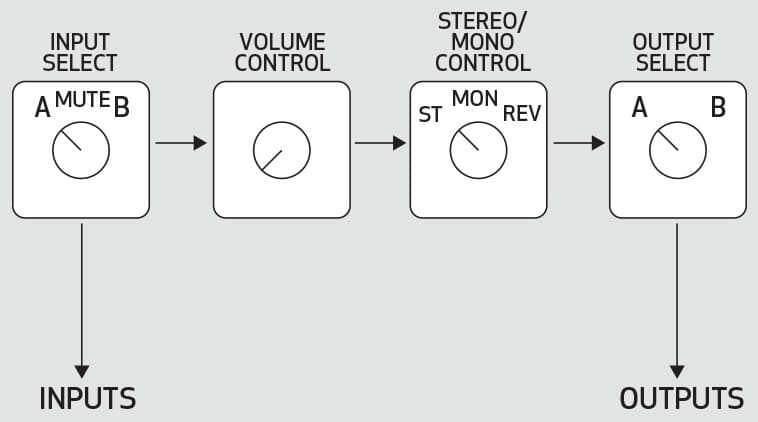
You can pick and choose the individual elements that you require for your own personalised monitor controller, however, it’s important that the elements are in the correct order. Quite specifically, the function of the stereo/mono/mono reverse switch must follow after the volume control and relies on the design of the volume control for its correct operation. Below is the block diagram of the order of the various elements:

If half the fun of this project is that you can build a very high-performance monitor controller the other half must be that you can use the information here to custom design exactly what you require in your studio. This can range from simply having a high quality straight volume control to increasing the number of inputs, including the mono switch or leaving it out and providing one, two or three outputs.
GETTING IN & OUT
Two intertwined issues remain. Getting your audio in and out with the connectors you choose and the box that all the controls are mounted in. Keep in mind that the purpose of this device is to be close at hand on your work surface, and especially if you go for the two inputs and outputs you’ll have a total of eight balanced audio cables hanging off the box containing the controls. Also, differing connectors require quite different amounts of panel space. At one extreme using all XLR connectors will require close to 77 square centimetres of panel space while using one Dsub connector will provide the same amount of audio connections in nine square centimetres. There’s no reason why the audio cables can’t simply fly out of the box through long cables directly to the sources and speakers. All this requires some planning, measurements and exploring the options of connectors and cases.
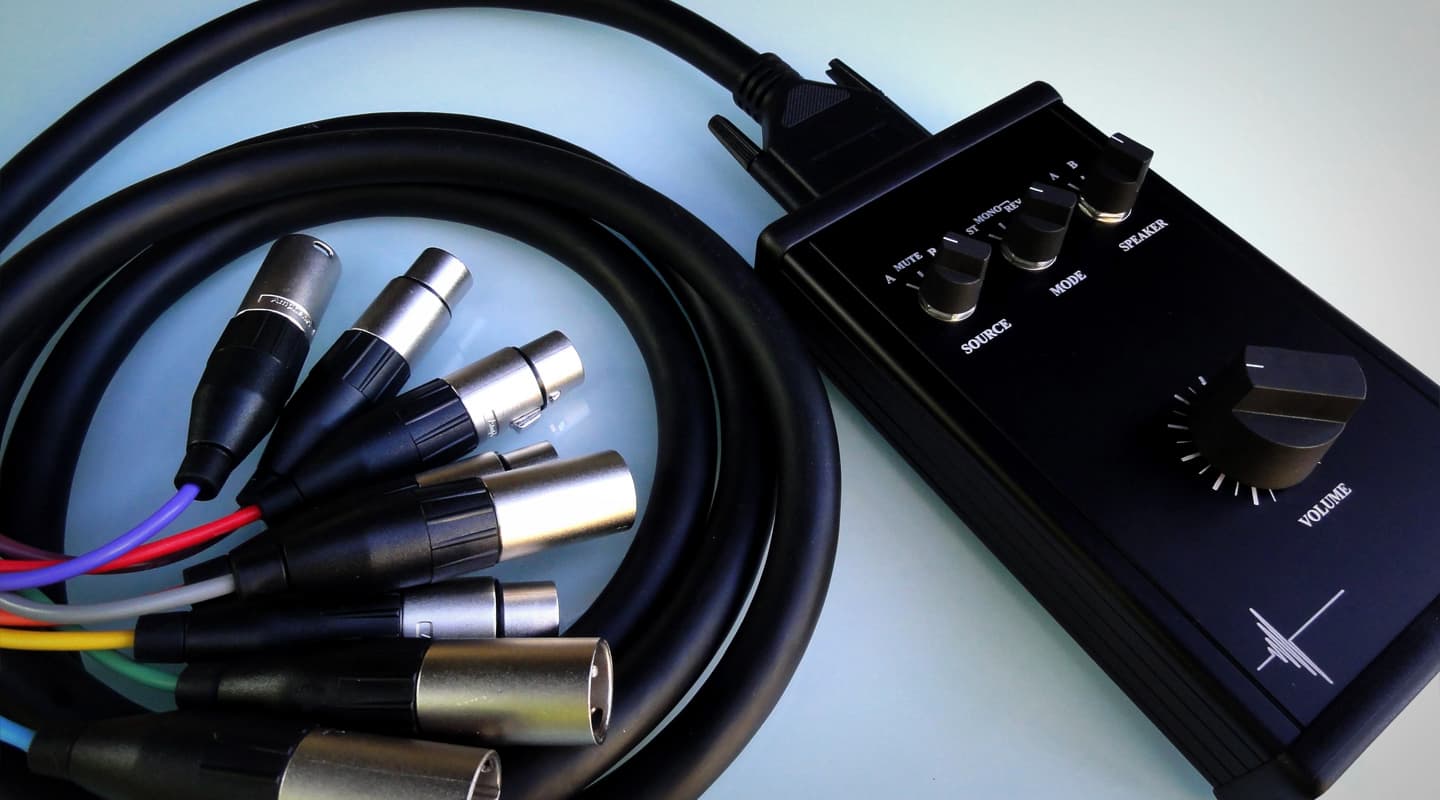
In the example presented here I’ve chosen a Dsub connector, which allows the unit to be easily set free of any wiring and when installed I can use a modified off-the-shelf Dsub-to-TRS or modify a Dsub-to-XLR cable, by taking a standard Dsub-to-male XLR cable and replacing the first four male XLRs with female XLRs.
Here’s how the Dsub connector is wired (below).

Like all good projects, some planning and having the right tools at hand will typically lead to a successful outcome. Map out the functions that you require, gather the switches, pot and knobs and begin thinking about options for a case and how this choice might influence what connectors you can use. With summer holidays on the way this could be an ideal opportunity to put to good use the tin can left over after you eat all the Christmas cake.
If there are some specific needs for your own custom master controller, and the wiring for this idea is unknown, drop us a line at AT and we’ll endeavour to design the solution for you.


Hi there,
Very interesting project here that has inspired me to build this monitor controller.
However, It is not a full balanced system I read on description.
Using a ALPS quad potentiometer instead a stereo one, how I can wiring it to obtain a full balanced path?
Also, I want to insert two 1:1 10k 10k matching transformers on the two inputs.
Could you help me to understand better how I can modify the original schematic in the right way?
Thanks
Thank you for a great idea.
I just finished one of these vith input select, stereo-mono-inverse and of course the volume control. Works very well between my DAW and the speaker power amp.
I made the volume control the way it is wired (at least the way I read it) in the drawing in the article where it looks like the wiper of the pot is connected to the “bottom” pin. It must however connect to the “top” of the pot, otherwise the control will give max. volume with the knob turned anti-clockwise.
Hi,
How can this be balanced ? In the simplest configuration, it seems that only hot and cold are connected to the pot. Are the grounds from the input and output jacks connected directly (either through a wire or the chassis?).
Thanks!
The actual signal switched or attenuated by this design is balanced, hot and cold, positive and negative, however you want to describe them. You have three options for the cable shield on pin 1 of an XLR or sleeve of a TRS –
1. You can be wire it through input to output, subject to ground loop hum.
2. If the equipment this box sits between is powered, they will likely both earth the cable shield and with option 1, you may get a ground loop hum. In this instance you would NOT connect the input and output shields of the cables.
3. … or a simple SPST switch between the input and output shield pins would give you a ground lift option like in a DI box, giving you the best of both worlds.
Nice project! Is there an easy way to implement a dim switch? Great work.
Dim switch would be easy, just increase the values of the series 4k7 resistors with a switch.
Hey guys!
Just looking at rotary switch options for an A / B input and mute to try this build. What specifications on the switch would you recommend for this? Cheers!
Hi, I’ve been studying this schematic and have been racking my brain trying to understand what’s going on here. I’ve tried what I think is going on but never works quite right. Are the ins and outs actually connect to each other? Can someone help clarify this schematic for me?
Thanks!
xtorsam@gmail.com
Hi I need a custom monitor switch, I need a schematic and circuit design on paper with details that match my requirements. Please respond so I can explain more.
Thanks,
Sam
I’m not understanding the wiring of the st, mono, ph_inv switch.
On position 1 (stereo), how does the left signal outputs? The left in’s and out’s are wired to each other and it’s puzzling my brain.
By the way, loved your diy, can’t wait to do it!
Left cold and hot inputs are directly connected to the outputs
No matter in what position is the switch, they always connected
Nevermind, I got it. I was so confused, after a sixth reading I finally understood it. Gold tutorial you have here!
Hi
Great information
Especially I like that trick with swapping phase when mono-ing.
Can you provide some basic schematics for that?
Looking for switch connections is little bit frustating and confusing.
I just wonder why putting in mono when switching phase on one channel gives out of differential signal.
Thank you
Hello! Great project!
Just finished mine! I only used at/mono/rev mono and the output selector. My idea idea was to free up some outputs on my interface so I can insert an analog chain for mastering.
I was wondering though: is it possible to have the “mono rev” in stereo? I feel it would be interesting to actually just monitor the sides and the stereo width rather its content in mono.
Any tips are greatly appreciated!
Thanks
Nico
Hello! Love this guide but one question:
Are the switch wiring diagrams facing the back of the switch?
I’m using Elma type 04 switches and they do not match up with these diagrams. The contacts are somewhat different. I’m able to work through the input and output switches, but I’m worried about the stereo/mono/inverse switch. For that one it seems like I need to follow the diagram exactly but if my switch contacts are different, I don’t imagine it working.
I’m not sure why all 3 position, 4 pole switches wouldn’t work the same.
Thanks,
Brandon