Microphones: Polar Response 1
In the eighteenth instalment of this on-going series Greg Simmons gets on-axis with microphone directionality…
Throughout the previous instalments we’ve covered a wide range of theoretical topics related to microphones. We’ve looked at how the different types of microphones work, we’ve dived deep into microphone specifications such as noise and distortion, we’ve zoomed out to consider the preamplifier and gain structure, and we’ve looked at common microphone ‘gotchas’ related to phase and comb filtering. There’s been a lot of theory and maths along the way, but it’s all valuable underpinning knowledge that informs and accelerates the practical process of microphone choice and placement.
There’s one more topic we need to discuss before we’re ready to put all of this information into practice. It’s a topic that is usually brought up early in most discussions about microphones, but it has intentionally been left until this point in this series because it is the keystone of the bridge between microphone theory and microphone application. Once we understand the theory of microphone polar responses we’ll have that keystone in place and we’ll be ready to cross the bridge to practical application.
ON-AXIS, OFF-AXIS, SPILL & AMBIENCE
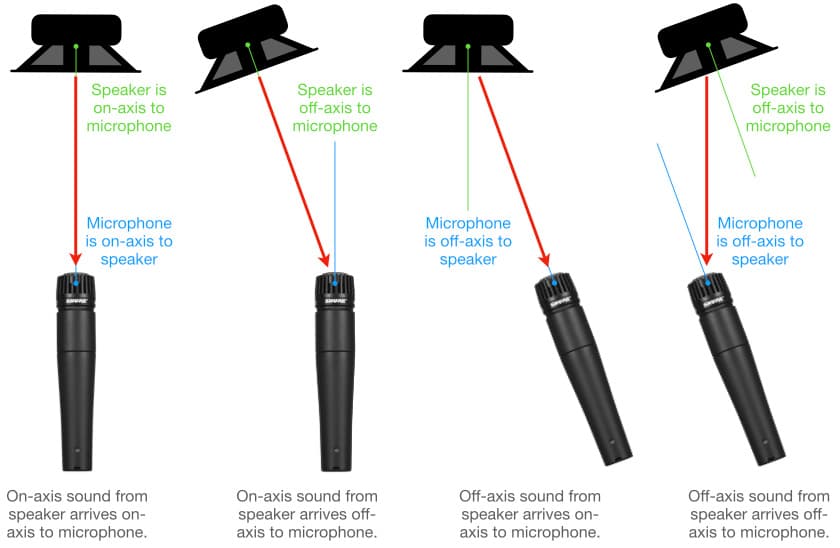
No serious discussion about polar responses would be complete without a clarification of the terms ‘on-axis’ and ‘off-axis’. In this discussion we’ll be using these terms in their most objective sense, whereby ‘on-axis’ refers to a specific placement in which the microphone and sound source are directly facing each other and share the same central axis (otherwise known as having an angle of incidence of 0°), and ‘off-axis’ is used to describe any placement that does not fit the definition of ‘on-axis’.
The illustration below shows four examples of objective on-axis and off-axis relationships between the sound source and the microphone. In the first example the microphone and speaker are on-axis, in the second example the speaker is off-axis to the microphone, in the third example the microphone is off-axis to the speaker, and in the fourth example the speaker and microphone are off-axis with each other. Although the speaker, microphone and speaker-to-mic distance remain the same in all four examples, the differing angles between them mean that each of the four examples could have a different tonality and the microphone might also require differing amounts of gain to achieve the same perceived level.
In practice we use the terms ‘on-axis’ and ‘off-axis’ in their subjective sense, whereby ‘on-axis’ refers to any angle whereby the sound source is obviously in front of the microphone; the tonality remains acceptable and there is not too much room sound or spill from other sound sources. For most directional microphones this means anywhere close to 0° and/or within the polar response’s Acceptance Angle (described later in this instalment).
In this subjective context, ‘off-axis’ refers to when the sound source no longer sounds as if it is in front of the microphone – the tonality is not acceptable, there might be too much room sound or spill from other sound sources, and generally it doesn’t sound right.
Boom operators on film and TV sets are particularly attuned to subtle changes between on- and off-axis sounds in the subjective sense – their job is to keep the dialogue as clear and distinct as possible (i.e. on-axis) as the actor moves around the set, keeping the microphone as close as necessary to the actor without letting it enter the frame (i.e. become visible on-screen). It looks easy until you try…
When a sound from one instrument arrives in another instrument’s microphone it is referred to as ‘leakage’. In most cases it is equivalent to the fourth example in the illustration above, where the leakage has come off-axis from the sound source and has arrived off-axis into the microphone. If the leakage has a negative effect on the overall sound, such as making it ‘roomy’ or ‘boxy’ and/or introducing comb filtering, it is usually referred to as ‘spill’. If the leakage has a positive effect on the overall sound, such as enhancing the tonality and/or adding a sense of ‘space’ or ‘size’, it is often referred to as ‘ambience’.
We’ll understand more about the relationship between polar response, spill and ambience after we discuss ‘off-axis response’ in the next instalment of this series.
POLAR RESPONSE
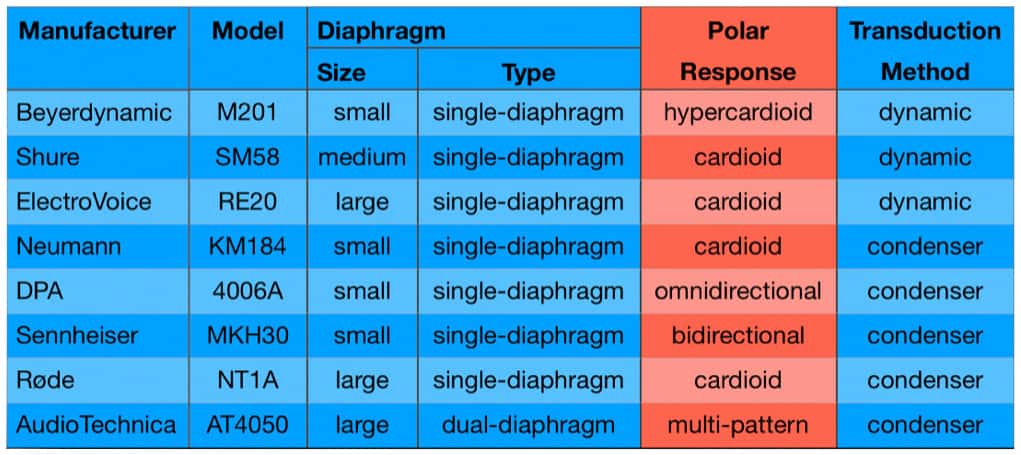
Dynamic and condenser mics are typically described by the following parameters in the following order: diaphragm size, diaphragm type, polar response, and method of transduction – as shown below:
For example, Neumann’s KM184 is a condenser microphone that uses a single diaphragm with a small diameter, and offers a cardioid polar response. It is best described as shown from left to right on the table above: small single-diaphragm cardioid condenser. The ‘small’ refers to the diaphragm’s surface area, of course, not the microphone’s physical size. For example, Shure’s Beta52A is a physically large microphone and it would be easy to assume it has a large diaphragm, when, in fact, its diaphragm is approximately the same size and shape as the diaphragm used in their Beta 57A handheld vocal microphone, making it a ‘medium’ diaphragm. The Beta 52A is a physically large microphone because it houses one or more large resonating chambers that contribute to its characteristic sound and suit its specialisation as a kick drum microphone (as explained in the instalment about Dynamic Microphones.)
We’ve already discussed diaphragm parameters and transduction methods in previous instalments, so let’s get on with the remaining part of the description…
What Is Polar Response?
A microphone’s polar response shows us how the microphone responds to sounds arriving from different directions, and is one of the most vital aspects of microphone choice and placement. It is, essentially, a graph of microphone output level vs angle of incidence, in other words, it shows the output level of the microphone for the same sound at the same distance but from different directions.
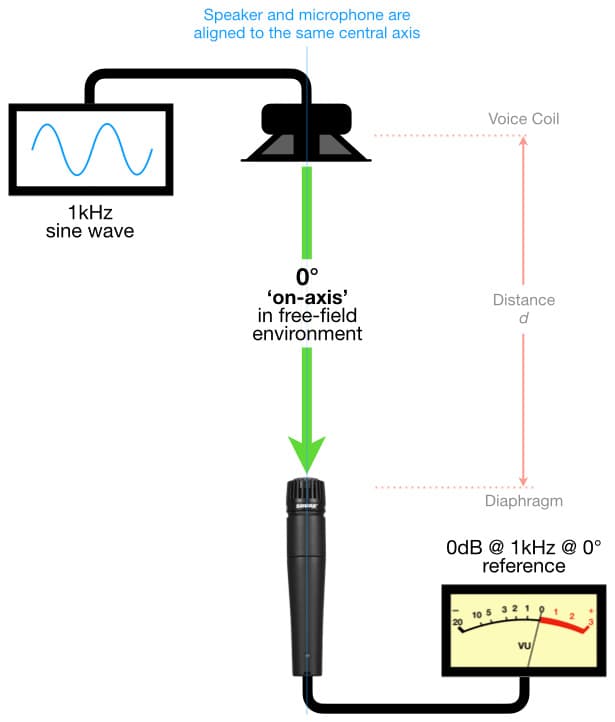
The concept for measuring a microphone’s polar response, and therefore understanding it, is simple. The microphone is placed in front of a speaker in a free-field environment (i.e. an environment free of reflections, such as an anechoic chamber), so that the only sound reaching the microphone is coming directly from the speaker.
The speaker is placed at a set distance in front of the microphone, and angled so that the speaker’s cone is facing directly into the microphone’s diaphragm. In this placement, the plane of the speaker’s cone is parallel with the plane of the microphone’s diaphragm, meaning there is no angle between them – in other words, the angle between them is 0°. Furthermore, the central axis of the speaker is aligned with the central axis of the microphone, and the speaker is then said to be ‘on axis’ to the microphone.
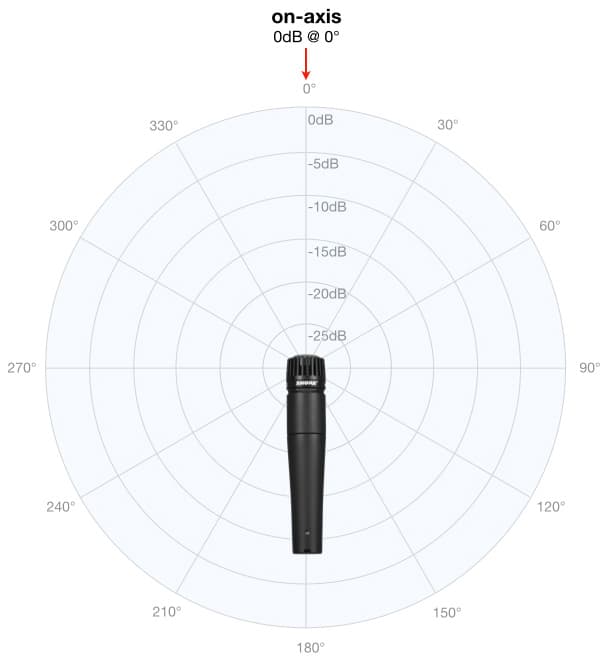
A 1kHz sine wave tone is reproduced through the speaker at a consistent SPL, and gain is applied to the microphone’s output signal until it reaches a level of 0dB on the meter. This forms a point of reference, as shown below.
Knowing that a 1kHz sine wave arriving on-axis to the microphone produces a level of 0dB, we’re now ready to see how the microphone responds to sounds arriving from other angles. From this we can derive the microphone’s polar response.
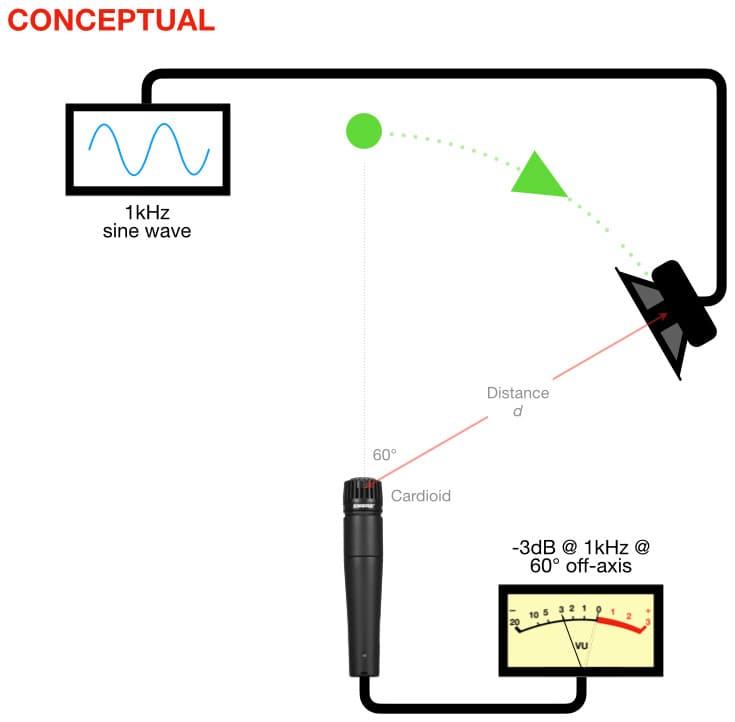
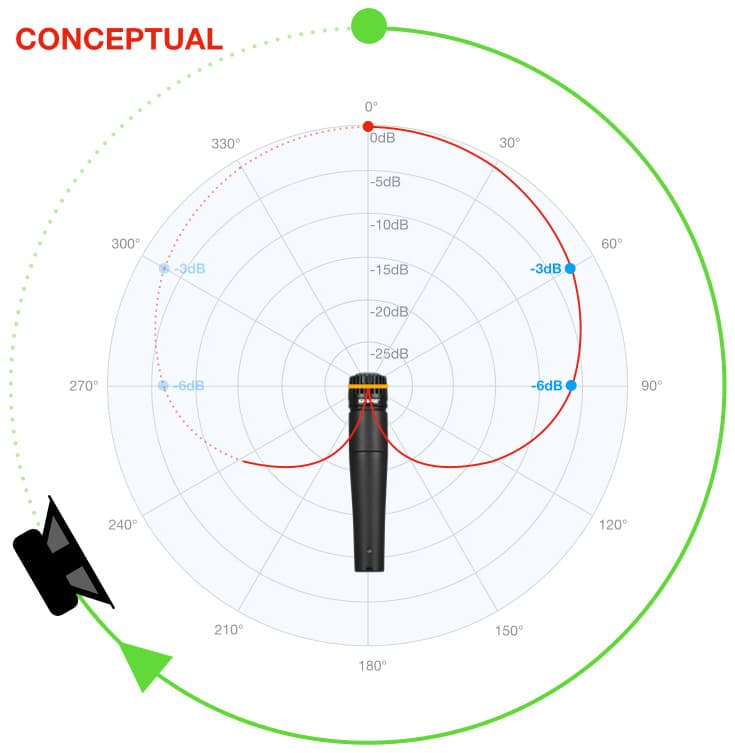
The concept is simple: keeping the distance and signal the same, the speaker is slowly moved around the mic in a large circle, from 0° to 360°, and any changes in the metered level are noted at their corresponding angles around the mic.
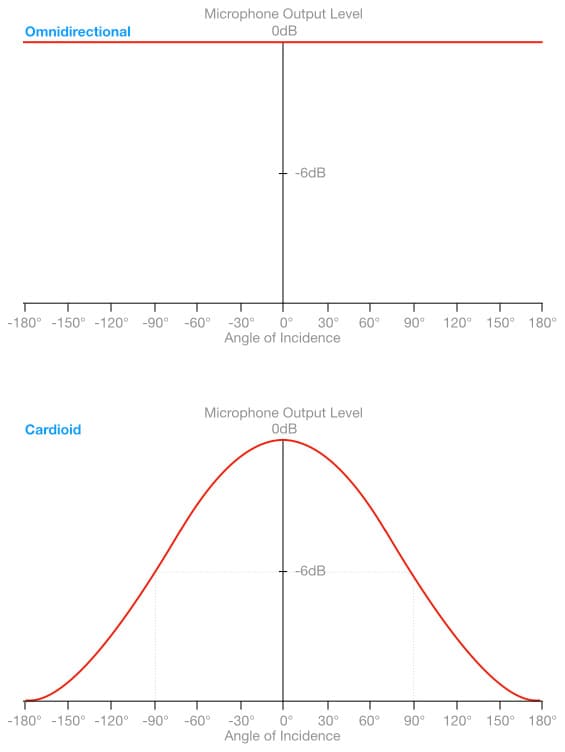
If we were to plot the microphone’s output level (in response to the same sound arriving from the same distance but at different angles of incidence) on a Cartesian plane graph (i.e. a standard graph of X and Y coordinates), it would look similar to the graphs below:
The graphs above show two different polar responses, each plotted on a Cartesian plane graph. The horizontal axis represents the angle of incidence, from 0° (on-axis to the front of the diaphragm) to ±180° off-axis (i.e. totally behind the diaphragm), while the vertical axis represents the output level of the microphone. The top graph shows the omnidirectional polar response in red, and we can see that the microphone’s output level remains consistent at 0dB regardless of the angle of incidence. The bottom graph shows the cardioid polar response in red with 0dB at 0° (on-axis), falling to -6dB at 90° off-axis and to theoretically nothing at ±180° off-axis.
Although the Cartesian plane graphs shown above are correct, they are not visually intuitive. If we are plotting a graph based on circular movement around a central point (e.g. a microphone), it is visually intuitive to plot the results on a circular graph where each measurement has an angle and an amplitude rather than an X and a Y coordinate. This is known as a polar graph. It consists of a series of concentric rings, with the outer-most ring representing the highest amplitude and the centre of the rings representing the lowest amplitude.
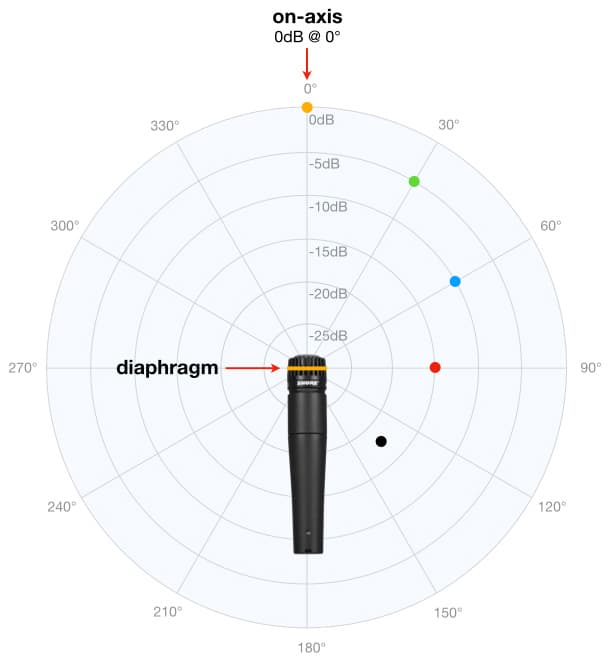
The illustration above shows how the polar graph is used to represent a microphone’s polar response. The on-axis point, or 0°, is usually placed at the top of the graph. The outer ring represents 0dB (the highest value) and the point in the centre of the graph represents -30dB. Moving from the outside ring towards the centre, each successive ring represents a drop of 5dB until we reach -30dB in the centre which, for most practical microphone rejection purposes, might as well be -∞dB.
Some visual elements have been added to the graph above for clarification and/or demonstration purposes. The gold line in the centre represents the microphone’s diaphragm, and we can see that it is facing the 0° point on the graph. Any point within the graph represents an angle of incidence and its amplitude. The gold dot at the top indicates that at 0° (on-axis) the microphone’s output level is 0dB, as it has been calibrated for. The green dot represents an amplitude of -5dB at 30°, the blue dot represents an amplitude of -10dB at 60°, the red dot represents an amplitude of -15dB at 90°, and the black dot represents an amplitude of approximately -18dB at about 135°.
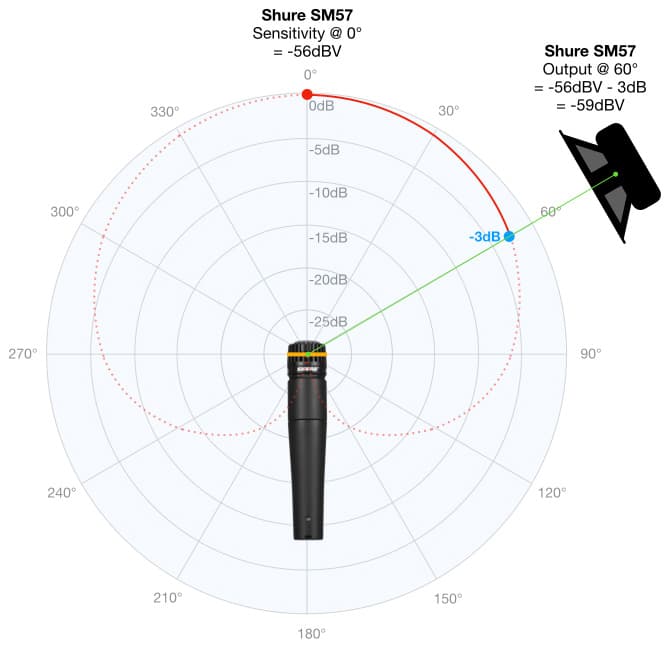
The illustration below shows the conceptual process of measuring a microphone’s polar response; in this case the microphone is Shure’s SM57 medium single-diaphragm cardioid dynamic. Although the speaker has only travelled 240° around the microphone, we can already see the SM57’s familiar cardioid polar response taking shape (red), confirmed by the cardioid’s characteristic levels of -3dB at 60°, -6dB at 90° (both measured relative to 0dB at 0°), and a null at 180°.
The description and illustration above provide a conceptual explanation of how a microphone’s polar response is measured, and helps us to visualise how the microphone will respond to numerous sounds arriving from different directions – as would happen in a live performance or in a studio environment when there are numerous sound sources performing simultaneously in the same space, each with their own microphone, and with each microphone capturing leakage from other instruments at different angles of incidence.
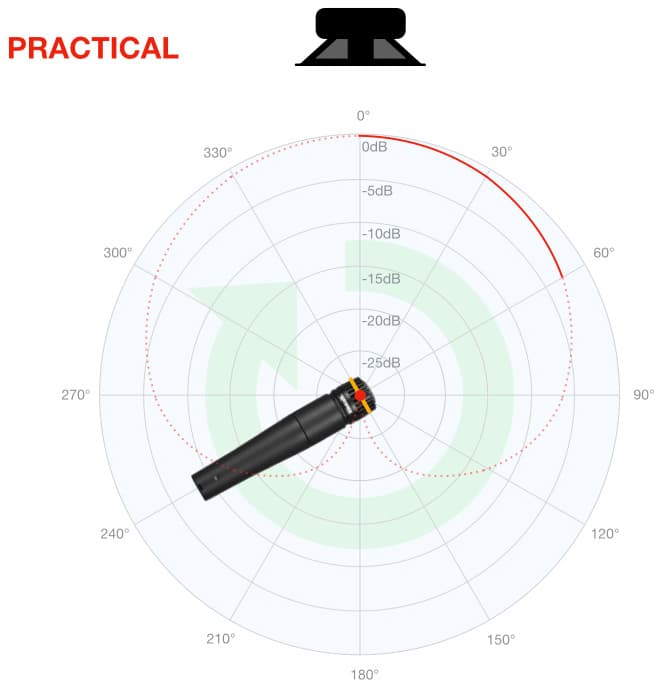
It is impractical to rotate the speaker around the microphone (as shown in the previous illustration) when there is a much simpler way to do it: the speaker remains stationary, and the microphone rotates around the vertical axis of its diaphragm, as shown below. This is how polar responses are usually measured…
FOUR FROM EIGHT
If we examine all of the different aspects of the audio industry we find there are eight commonly used polar responses: omnidirectional, bidirectional, cardioid, supercardioid, hypercardioid, subcardioid, lobar/shotgun and hemispherical. As we’ll see in a forthcoming instalment of this series, each of these polar responses is ultimately derived from a combination of the omnidirectional and bidirectional polar responses, although some get additional help from acoustic modifiers.
Each polar response has four attributes that help us determine its suitability for a given application: acceptance angle, rejection null(s), distance factor and proximity effect.
Acceptance Angle
In an earlier instalment of this series we discussed a microphone specification called Sensitivity, which tells us how much signal voltage will come out of the microphone when an on-axis sound source is reproducing a 1kHz sine wave with an SPL of 94dB at the diaphragm. We learnt that to minimise the risks of noise and distortion from our mics and/or preamps we should use mics with high Sensitivity for capturing soft sounds, and we should use mics with low Sensitivity for capturing loud sounds.
The Sensitivity specification assumes the sound source is arriving on-axis to the diaphragm, i.e. the angle of incidence is 0°. We can think of the polar response as an off-axis Sensitivity measurement, showing how the microphone’s Sensitivity changes depending on the angle of incidence.
As we already know, the polar response measurement begins at 0° (on-axis) with the microphone’s output gained up to reach a metered level of 0dB. If the microphone has any directionality (i.e. it’s not omnidirectional), we will see a reduction in the metered level as we move the sound source away from 0° and around the microphone. The sound source hasn’t changed its frequency, its SPL at the diaphragm, or its distance from the mic. The only change has been its angle of incidence to the microphone’s diaphragm, and this has created a decrease in the microphone’s output level that ultimately represents a decrease in the microphone’s Sensitivity; we can say that the microphone becomes less sensitive when the sound source is moved off-axis.
We can think of the polar response as an off-axis Sensitivity measurement…
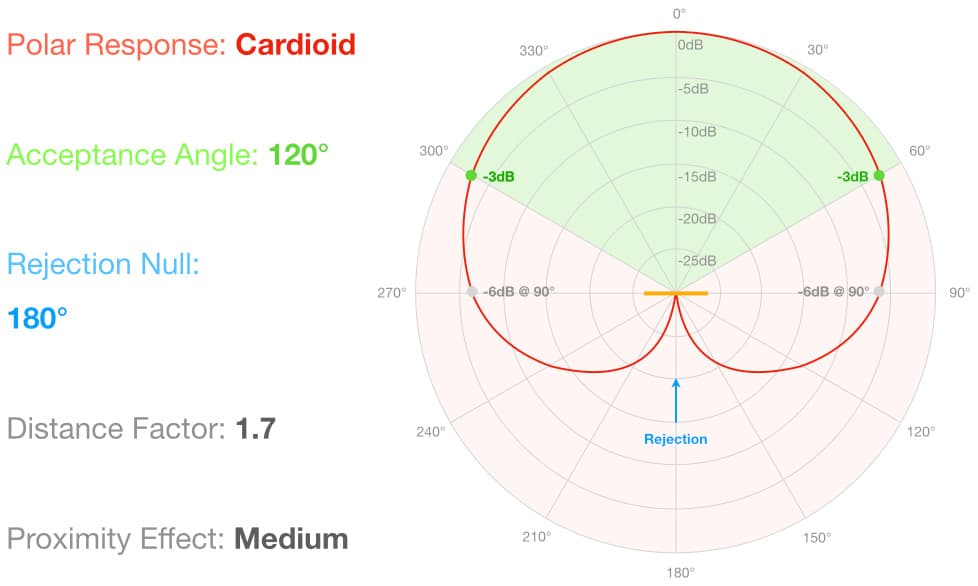
The Acceptance Angle specification tells us how far we can move the sound source off-axis until the metered level has dropped from 0dB (on-axis) to -3dB. For example, the cardioid polar response shows us that a cardioid microphone becomes 3dB less sensitive when the sound source is moved from 0° (on-axis) to 60° (off-axis) in any direction. This gives the cardioid polar response an acceptance angle of 120°, i.e. ±60° in any direction away from 0°.
As a rule-of-thumb, most microphones give their best performance when the sound source is located within their Acceptance Angle – we’ll understand more about that after we look at ‘Off-Axis Response’ in the next instalment of this series. All of the following polar responses have their Acceptance Angle shaded in green to make it more obvious. Note that more directional polar responses have narrower acceptance angles than less directional polar responses.
Rejection Null(s)
In addition to being most sensitive to sounds arriving at 0°, most directional microphones have one or more angles of incidence at which the microphone is least sensitive. These angles of lowest sensitivity often appear as deep notches or nulls in the polar response, and are called rejection nulls because they offer the highest rejection of incident sound. (The use of the word ‘null’ might seem extreme because it implies a complete rejection, which only occurs with the bidirectional polar response. It was the first of the directional polar responses, and every other directional polar response contains a bidirectional component, so the word ‘null’ remains valid.)
Understanding how to use a microphone’s rejection nulls is one of the most important aspects of microphone choice and placement. Anyone can point the front of a microphone at the sound they want; a monkey can be trained to do that, and therefore so can you. The real challenge, and reward, lies in choosing a polar response that allows us to aim the front of the mic at the sound we want while simultaneously aiming its rejection null(s) at the sound(s) we don’t want. Capturing more of the sound we want and less of the sound(s) we don’t want results in cleaner sounds overall and less work downstream. We’ll learn more about doing that in the forthcoming instalments of this series…
All of the following polar response illustrations have their rejection nulls (if any) indicated with blue arrows.
Distance Factor
The Distance Factor specification is a simple way of representing and comparing the directionality of different polar responses. As a broad generalisation, a higher Distance Factor means a higher on-axis directionality and, therefore, a narrower Acceptance Angle. There are some exceptions to this generalisation, but before we can understand those exceptions we must become familiar with the common polar responses – which we’re about to do. We’ll look at Distance Factor in detail in the next instalment of this series…
Anyone can point the front of a microphone at the sound they want; a monkey can be trained to do that...
Proximity Effect
The proximity effect has been discussed numerous times throughout this series. It refers to the well-known boost of low frequency energy that occurs when we get close to a directional microphone (typically less than 30cm), but it also refers to the lesser known loss of low frequency energy that occurs when we get further away from a directional microphone (typically more than 30cm). With very few exceptions, all directional microphones exhibit some proximity effect; the higher the directionality, the higher the proximity effect. The omnidirectional polar response has no proximity effect, the bidirectional polar response has the highest proximity effect, and the cardioid polar response sits in between them. We’ll look at the factors that cause the proximity effect in a forthcoming instalment of this series.
STRAIGHT EIGHT
With all of that important background information out of the way, it’s finally time to look at those eight most common polar responses: omnidirectional, bidirectional, cardioid, supercardioid, hypercardioid, subcardioid, lobar/shotgun and hemispherical. We’re going to start with the omnidirectional and bidirectional responses because all of the other polar responses are created by combining these two polar responses together.
Omnidirectional Polar Response
The prefix ‘omni’ comes from the Latin word ‘omnis’, meaning ‘all’, so an ‘omnidirectional polar response’ is one that responds equally well to sounds arriving from all directions.[/vc_column_text]
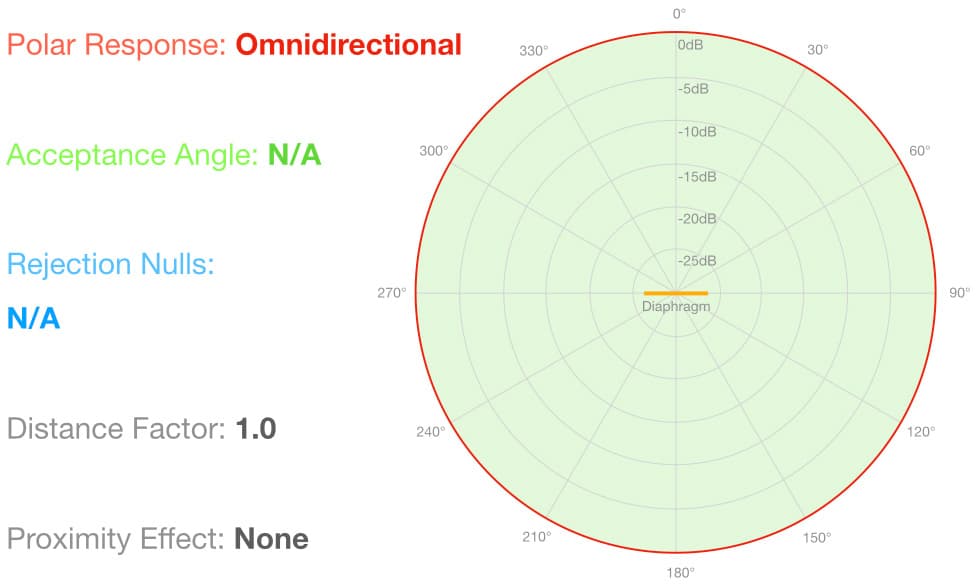
The illustration above shows the omnidirectional polar response; it’s the red circle going around the outside edge of the polar graph and indicates that for any given SPL and distance, the microphone’s output level will be the same regardless of the angle of incidence.
As we can see, the omnidirectional polar response has no directionality and therefore the concept of an Acceptance Angle is not applicable (N/A) because there is no point where the polar response falls to -3dB as required to define an Acceptance Angle. Similarly, the concept of rejection nulls is not applicable because there are no nulls or dips in the polar response. Also, because it has no bidirectional component it has no proximity effect: the low frequency response of the omnidirectional polar response remains consistent regardless of its distance from the sound source.
The omnidirectional polar response is the reference for Distance Factor calculations, which is why it has a Distance Factor of 1.
Bidirectional Polar Response
The prefix ‘bi’ is from Latin and means ‘two’, therefore a bidirectional microphone has two directions. Among other things, this means its polar response has two on-axis points.
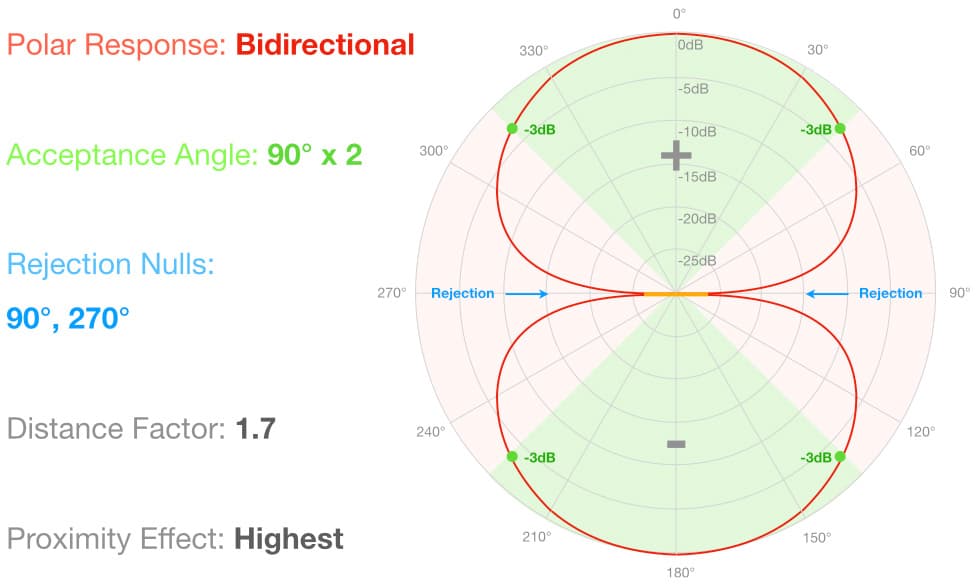
The illustration above shows the bidirectional polar response, which is also known as a ‘Figure-of-8’ polar response for obvious reasons. We can see two lobes: one at the top of the illustration where 0° is on-axis, and one at the bottom of the illustration where 180° is on-axis. The 0° axis is the front of the microphone, and the 180° axis is the rear of the microphone.
Each lobe has an Acceptance Angle of 90°, which is the narrowest of any polar response except those using acoustic modifiers (such as the interference tube used to created the shotgun/lobar response). However, because it has two lobes it is capable of capturing a total of 180° of the sound field within its two Acceptance Angles (90° at the front and 90° at the rear).
In between the two lobes are two rejection nulls, one at 90° and one at 270°. These offer the strongest rejection of any polar response. If you placed a point source (i.e. an insignificantly small sound source that radiated sound equally in all directions) at 90° or 270° off-axis to a single-diaphragm bidirectional microphone in a free-field environment, the rejection of the direct sound would be infinite.
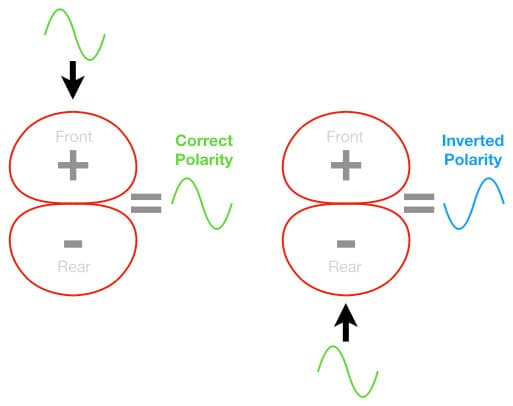
One important characteristic of the bidirectional polar response is that the rear lobe has the opposite polarity of the front lobe, as indicated with the ‘+’ and ‘-‘ symbols on the bidirectional polar response illustration above. A signal captured by the front lobe will be reproduced in the correct polarity, while a signal captured by the rear lobe will be reproduced with inverted polarity.
This polarity inversion for sounds arriving from the rear is what gives the bidirectional polar response its directionality, its deep rejection nulls, and, ultimately, its high proximity effect. In fact, these aspects of the bidirectional polar response give all directional microphones (with very few exceptions) their directionality, their rejection nulls and their proximity effect, because all of the standard directional polar responses consist of a blend of an omnidirectional polar response and a bidirectional polar response. We’ll learn more about these things in the forthcoming instalment about how polar responses are created.
The bidirectional polar response has a Distance Factor of 1.7, which means a bidirectional microphone can be placed 1.7x further from a sound source than an omnidirectional microphone but capture the same balance of direct and indirect sound.
Cardioid Polar Response
The word ‘cardioid’ is derived from ‘kardiá’, the Greek word for ‘heart’. It’s often used in mathematics and geometry to describe a heart-shaped curve, as shown in the cardioid polar response below:
As we’ll learn in a forthcoming instalment, the cardioid polar response consists of equal quantities of the omnidirectional and bidirectional polar responses. As such, we can expect it to represent a ‘happy medium’ between them. It has a wider Acceptance Angle than the bidirectional (120° vs 90°), but only a single rejection null (directly behind, at 180°) that typically offers more than 20dB of rejection. Note that the polar response falls to -6dB for sounds arriving from the sides (90° and 270°), which should not be surprising considering that at those two angles the bidirectional component of the cardioid polar response is not contributing anything to the microphone’s output signal – more about that in a forthcoming instalment. Similarly, because it contains only 50% of the bidirectional polar response, a cardioid microphone’s proximity effect is not as strong as it is with a bidirectional microphone. Both polar responses share the same Distance Factor of 1.7, meaning a cardioid microphone and a bidirectional microphone can both be placed 1.7x further from a sound source than an omnidirectional microphone to capture the same balance of direct and indirect sound. However, a quick glance at the cardioid and bidirectional polar responses shows that the indirect sound captured by the cardioid would be mostly coming from in front of the mic, while for the bidirectional it would be mostly coming from behind. In other words, both polar responses are open to the same amount of indirect sound, but from different directions and therefore with different tonalities and different levels (more about that in the next instalment).
Supercardioid & Hypercardioid Polar Responses
As we’ve just seen, the cardioid polar response uses equal quantities of the omnidirectional polar response and the bidirectional polar response. The supercardioid and hypercardioid polar responses are variations of the cardioid polar response that use a little more of the bidirectional component to increase their directionality, as evidenced by their distinctive rear lobes.
They both offer narrower Acceptance Angles than the cardioid, and both offer two rejection nulls. The trade-offs are, of course, more pickup from the rear due to the rear lobe, and a higher proximity effect due to containing more of the bidirectional component.
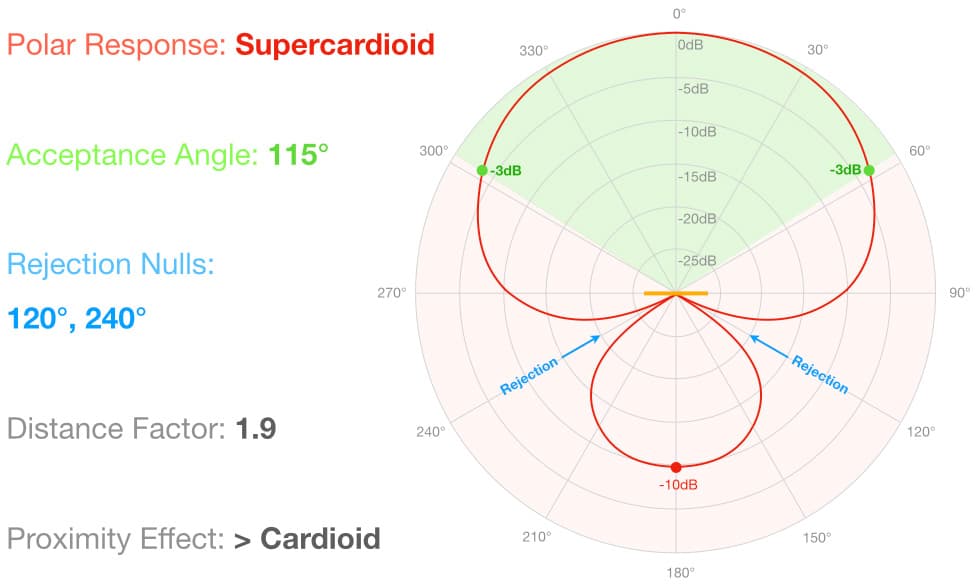
The supercardioid polar response, shown above, has an Acceptance Angle of 115°, and two rejection nulls: one at 120° and one at 240°. The rejection nulls are not quite as wide as the cardioid’s single rejection null, but they’re wide enough to be useful. Sounds entering the rear lobe from 180° are attenuated by approximately 10dB. It has a marginally higher proximity effect than the cardioid, because it contains marginally more of the bidirectional component. It has an impressively high Distance Factor of 1.9, meaning a supercardioid mic can be placed 1.9x further from a sound source than an omnidirectional mic but still capture the same balance of direct and indirect sound.
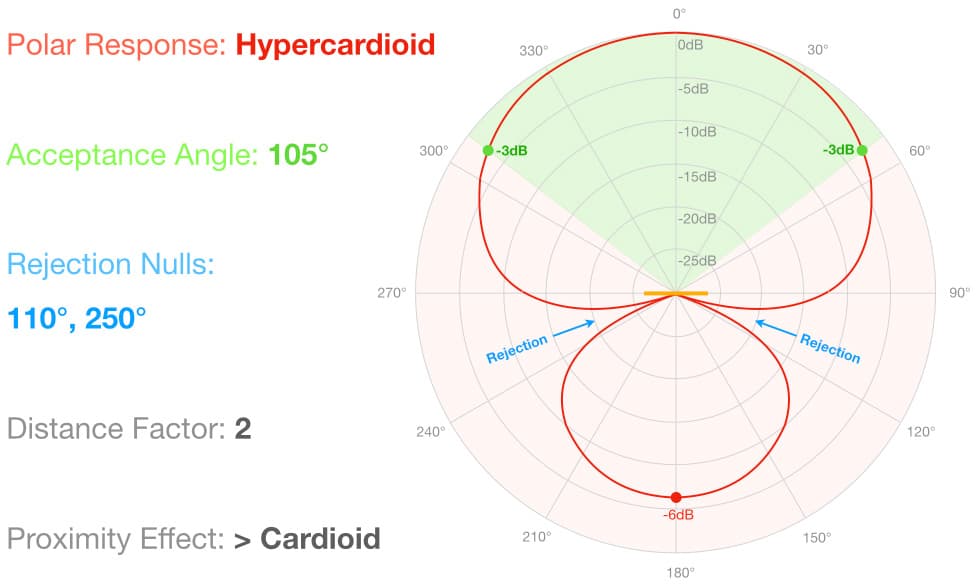
The hypercardioid polar response, shown above, has an Acceptance Angle of 105°, making it slightly more directional than the supercardioid, with rejection nulls at 110° and 250° respectively; they’re marginally narrower than the supercardioid’s rejection nulls but remain wide enough to be useful. Because it contains more of the bidirectional component than the supercardioid, the rear lobe is larger (sounds entering the rear lobe from 180° are attenuated by about 6dB) and the proximity effect is slightly higher. It has a Distance Factor of 2, which is the highest of all the polar responses shown here. This means that a hypercardioid mic can be placed 2x further from a sound source than an omnidirectional mic but capture the same balance of direct and indirect sound.
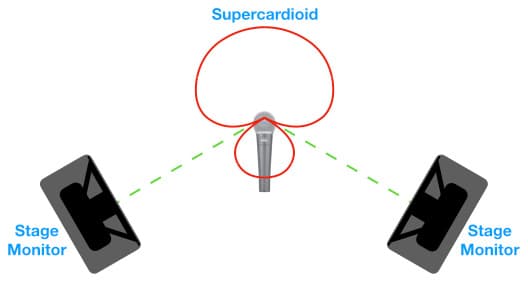
The two rear rejection nulls make the supercardioid and hypercardioid polar responses popular for live vocals, where two monitor wedges are used to provide the vocalist with foldback/monitoring. Aligning the monitors with the rejection nulls offers a considerable increase in gain-before-feedback, while the rear lobe faces out to the audience and has little chance of capturing any significant spill from on stage.
Subcardioid Polar Response
As we’ve already seen, the cardioid polar response contains equal quantities of the omnidirectional and bidirectional polar responses. The more directional supercardioid and hypercardioid polar responses contain a higher bidirectional component than the omnidirectional component, which is what makes them more directional while also giving them their distinctive rear lobes.
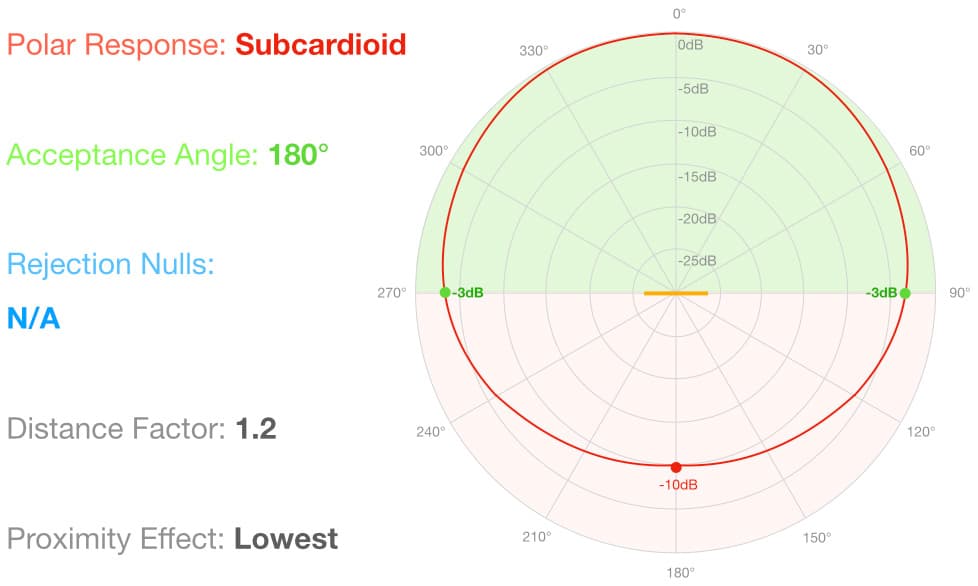
The subcardioid polar response (also referred to as ‘hypocardioid’ or ‘wide cardioid’) shifts the omnidirectional/bidirectional balance the other way, with less bidirectional component and more omnidirectional component. It is, essentially, an omnidirectional response but with less sensitivity to sounds arriving from behind. There are numerous variations of the subcardioid polar response; the one shown in the illustration above has an Acceptance Angle of 180°, no rejection nulls, and is about 10dB less sensitive to sounds arriving from 180° than it is to sounds arriving on-axis. Because its polar response is dominated by the omnidirectional component, it has very little proximity effect and a small Distance Factor of 1.2.
The subcardioid polar response is often favoured for capturing live performances of orchestral, chamber and choral music. It offers many of the characteristics of the omnidirectional polar response but with a slight touch of directionality to reduce the capture of audience and room noises. Perhaps counter-intuitively, it’s also often favoured as a spot microphone in orchestral situations because its wide Acceptance Angle means any leakage from other instruments is captured cleanly and hopefully becomes ambience rather than spill.
Lobar/Shotgun Polar Response
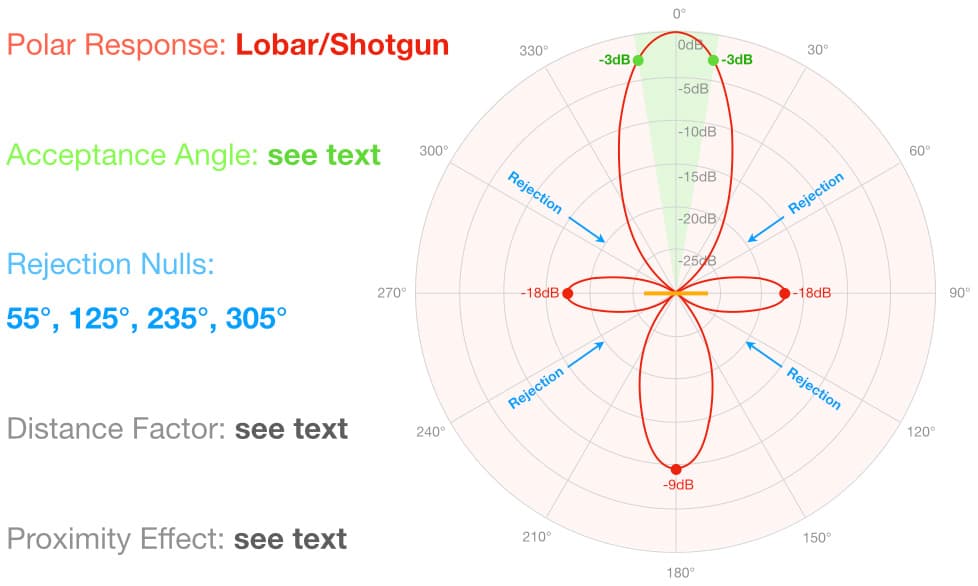
The highly directional lobar or shotgun polar response is commonly used for capturing dialogue in film, TV and video applications. This polar response is created by placing an acoustic modifier in the form of an interference tube on the axis of a supercardioid or hypercardioid microphone.
The amount of directionality is essentially determined by the length of the interference tube, and the resulting polar responses can often be less-than-flattering. For these reasons, rather than showing a polar response some manufacturers will simply refer to the polar response as being ‘supercardioid lobar’ or ‘hypercardioid lobar’, indicating the polar response of the microphone that’s being used (supercardioid or hypercardioid) along with additional directionality (lobing) created by the interference tube.
The illustration above is a theoretical/mathematical representation of a lobar polar response with a front lobe, a rear lobe, and two lobes out the sides that, in turn, create four rejection nulls. In this theoretical example the Acceptance Angle is narrow to the point of being unlikely. Due to the differing designs and interference tube lengths, it is difficult to provide figures for the shotgun polar response’s proximity effect. Its Distance Factor is often quoted as 3, which means a shotgun microphone can be placed 3x further from a sound source than an omnidirectional and still capture the same balance of direct and indirect sound. However, this is heavily dependent on the design and length of the interference tube.
The lobar/shotgun polar response can be excellent for capturing dialogue from a metre or so away outdoors or in a large open space such as a film set, but they can sound bad in smaller confined spaces due to how the side lobes and interference tube interact with sound reflections from nearby surfaces (when used in small spaces it is worth applying acoustic absorption to any nearby reflecting surfaces).
Small and/or short shotgun mics are often seen mounted on top of cameras for on-the-go vlogging purposes. This on-camera placement is good when the microphone/camera combination is held at an arm’s length and facing the presenter, but when shooting at distances that put the camera more than an arm’s length from the voice it is best to keep the microphone close to the voice by removing it from the camera and placing it on a microphone stand (Youtubers) or a boom pole (film/TV/documentary applications). The camera goes where the camera needs to go for the best visuals, and the microphone goes where the microphone needs to go for the best sound. The best placement for the camera is rarely the best placement for the microphone, and vice versa. It’s physics, not magic…
Hemispherical Polar Response
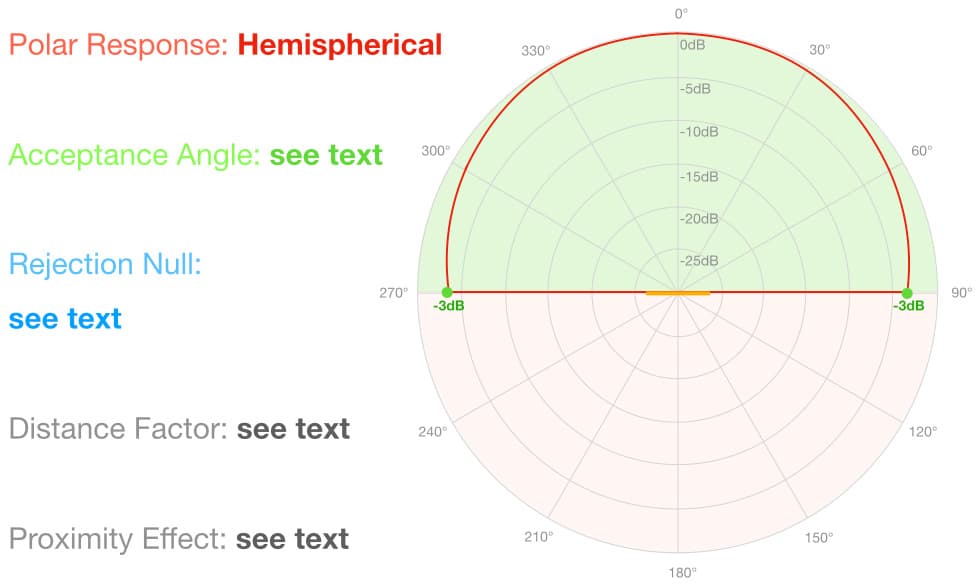
As with the lobar/shotgun polar response described above, the hemispherical polar response takes one of the existing polar responses and combines it with an acoustic modifier, in this case a flat surface or boundary. Microphones that offer a hemispherical response are often referred to as boundary microphones, Pressure Zone Microphones or PZMs (note that ‘Pressure Zone Microphone’ and ‘PZM’ are trademarks of Crown International).
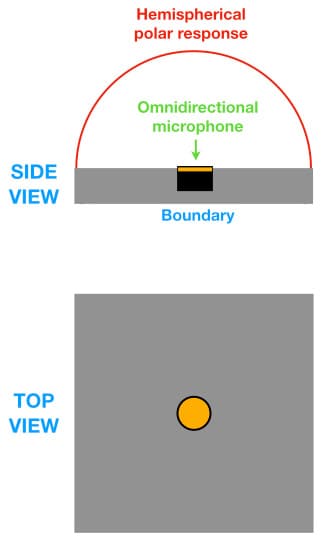
The simplest form of the hemispherical polar response is created by embedding a microphone with an omnidirectional polar response into a boundary such that its diaphragm is flush with the boundary, as shown below:
The best placement for the camera is rarely the best placement for the microphone…
Crown’s PZM, based on a design originally licensed from Ken Wahrenbrock, takes a slightly different approach: rather than mounting the microphone so that its diaphragm is flush with the boundary, the PZM places the diaphragm slightly above the boundary but facing downwards into it, putting it in the ‘acoustic pressure zone’ that exists on the surface of a boundary. This also creates a hemispherical polar response.
The hemispherical polar response captures sounds equally well over a 180° range, but entirely rejects all sounds arriving from behind because sounds from those directions do not arrive on the boundary. It is, essentially, the top half of an omnidirectional polar response. In that respect it has no Acceptance Angle per se, and no proximity effect. Because it is only half of the omnidirectional polar response (sounds arriving from behind are blocked by the boundary), the hemispherical polar response typically has a Distance Factor of 1.4, which means a boundary mic can be placed 1.4x further from a sound source than an omnidirectional mic to capture the same balance of direct and indirect sound.
Microphones with hemispherical polar responses are designed to be flush-mounted on a flat surface such as a wall, a floor or a desk. This placement increases the size of the boundary and extends their low frequency response. They are commonly placed on conference room desks to capture what is being discussed without placing a microphone in front of each person. They can also be placed on the wall or window of a recording studio to capture a very useable room sound.
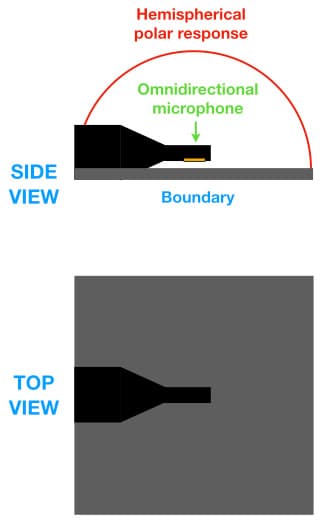
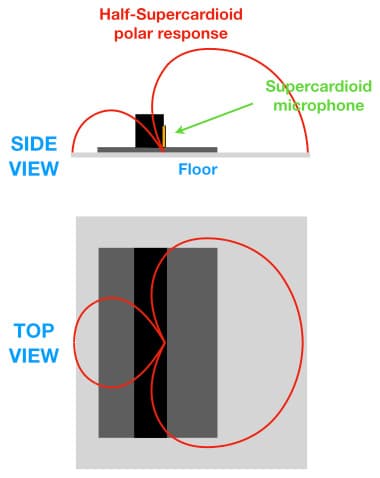
It’s worth noting that Crown has pushed the boundary idea further and created a range of specialised polar responses for different applications. The PCC160 (shown below) is an interesting variation that replaces the boundary-mounted omnidirectional capsule with a boundary-mounted supercardioid capsule, creating a half-supercardioid polar response. It’s often used for theatrical sound reinforcement where two or more are placed across the front of the stage floor to capture the sounds of footfalls (dancing, acrobatics, flamenco, etc.), or to capture large groups singing in music theatre applications where it is impractical to fit a lavalier microphone on every performer. If placed slightly forward of any floor monitors, and/or angled appropriately, the rear nulls can be used to increase gain-before-feedback considerably.
We’ll discuss boundary mics and their applications in further detail in a forthcoming instalment.
CONCLUSION
In this instalment we’ve looked at the eight most commonly used polar responses throughout the numerous aspects of the audio industry. Some of these are very well known (cardioid), some are far more popular than we would assume (every mobile phone contains an omnidirectional microphone), and others offer varying degrees of speciality that make them commonplace in some aspects of professional audio but unheard of in others.
In the next instalment we’re going to dive deeper into polar responses and their Distance Factors. After that we’ll explore the topic of ‘off-axis response’ which helps us understand why microphones don’t always perform as their polar responses would suggest.












Excellent info. Thank You
Great article, very thorough. As always Greg’s articles are always very easy read and to understand. Thank you for sharing your wealth of information. Look forward to your next one.
Thank you, more coming!
Wow, comprehensive, but easily understood and now mic and acoustic placements makes more sense and almost fun at least for my home vocal recordings! The mic sensitivity article kept me tuned in to this series now.