
Mixing With Headphones 3
In the third instalment of this six-part series, Greg Simmons describes the tools and templates we need for mixing on headphones.
In the previous instalment of this six-part series we looked at the fundamental differences between mixing with headphones and mixing with speakers. We saw that speaker monitoring introduces a lot of variables to our mix because what we are hearing from the speakers is not what is coming out of the mixing console or DAW. The frequency response and distortion of our speakers has been embedded into it; the acoustics of our listening room have been superimposed upon it; and there might be comb-filtering issues due to reflections off nearby surfaces that have influenced our tonal decisions. Compensating for those variables during the course of a mixing session adds resilience to our speaker mixes and thereby improves how well they translate to other listening environments.
None of those variables occur when monitoring with headphones, and therefore our headphone mixes don’t get the same resilience built into them – meaning they don’t translate to numerous playback situations as well as speaker mixes do. There are, however, a number of tools and hacks we can use to reveal and/or emulate those variables and compensate for them.
HEADPHONE MIXING TOOLS & HACKS
In every discussion about audio metering devices and similar tools there’s always someone offering the seemingly well-intentioned advice of “just trust your ears”. Such platitudinal nonsense, comforting though it might be, always needs to be taken in context before being summarily dismissed with the same “you don’t need all of that stuff” gusto that accompanied it. Why?
It usually comes from experienced people who have already made enough expensive and/or regrettable mistakes to know what to listen for, and who are working in situations that provide enough information to allow informed decision-making (ie. working in acoustically-designed control rooms fitted with big monitor speakers). They have also been receiving years of feedback from downstream mastering engineers and others, which has further refined their mixing skills. In other words, they have the right combination of equipment, experience and listening skills that allows them to trust what their ears are telling them.
The same ‘feel good’ advice is often parroted by novices, wannabes and wish-casters who embraced it earlier and are diligently waiting for it to ‘kick in’ and prove true – until then, their ‘trust your ears’ mixes are deteriorating while their mastering engineer’s income is improving.
How wonderful would it be if the entirety of audio engineering could be summed up with “just trust your ears”? There would be no need for all of the eye-glazing maths and physics; no need for the many thousands of words and illustrations in audio engineering textbooks; no need for audio courses; no need for acousticians; and no need for sound engineers. Audio engineering would be as intuitive as walking – it only gets hard if you think about how you are doing it.
The people asking the questions that trigger the ‘just trust your ears’ response don’t have the required combination of equipment, experience and listening skills to be able to trust what their ears are telling them – which is why they are asking such a question in the first place. Telling them to ‘just trust their ears’ is misleading at best, and flexing at worst – especially if it is given in reference to mixing with headphones. No matter how much expertise the people offering such advice might have, they obviously don’t have the common sense required to properly contextualise the question and either provide a meaningful answer or STFU. As has been repeated many times by numerous leading figures throughout history, “if your words are not better than silence, then be silent”.
We’ve already established that a number of variables are missing in headphone monitoring that exist in speaker monitoring. This means we cannot simply ‘trust our ears’ when mixing in headphones because our ears are not getting enough information to make reliable decisions. We can, however, benefit from tools that allow us to see on a screen what we don’t hear in headphones and thereby provide us with meaningful visual guidelines. Staying within those visual guidelines allows us to trust our ears for everything else, and hopefully make headphone mixes that translate well across all playback systems in the same way that a good speaker mix does.
What do we need? Read on…
HEADPHONES & FREQUENCY RESPONSE
The requirement for good headphones goes without saying, of course, for all of the frequency response and room acoustics reasons outlined in the previous instalment. A pair of contemporary headphones, voiced to the Harman curve or similar, should take care of the frequency response aspects of the translation problem and prevent any significant tonal surprises when a mix made on headphones is heard through speakers.
Audio engineering would be as intuitive as walking…
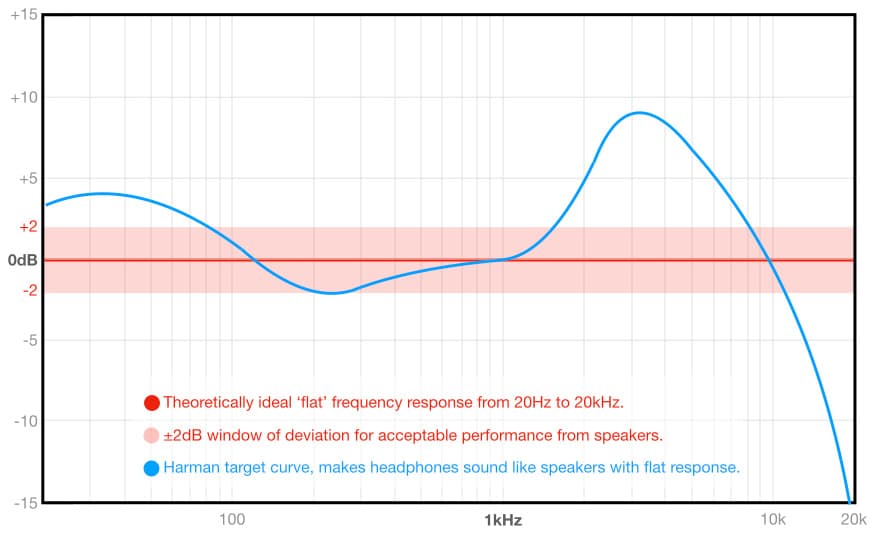
There are many headphones on the market that are suitable for mixing. As a generalisation, open-back headphones provide higher fidelity, especially at low frequencies, but closed-back headphones have the advantage when isolation is required.
Headphones with active noise-cancellation are not recommended for mixing, and neither are wireless headphones. Active noise-cancelling headphones use polarity inversion and equalisation to reduce (ie. cancel) the audibility of background sounds (ie. noise). Wireless headphones use data compression algorithms to reduce the signal’s bitrate so it can be transmitted wirelessly without drop-outs and buffering issues. Although each technology provides an enjoyable listening experience, neither can be trusted for mixing.
If you plan on mixing through the headphone socket of a laptop or similar portable device – rather than using an audio interface or a dedicated headphone amplifier – you’re going to need headphones with high sensitivity and low impedance. Why? Because they’re easier to drive to useful SPLs from the low voltage amplifiers found in battery-powered equipment such as mobile devices. To understand why, scroll down to ‘Impedance, Power, Sensitivity & SPL’.
6dB GUIDE & FREQUENCY BALANCE
Despite the voicing methods described in the previous instalment that aim to reduce tonal discrepancies between headphones and speakers, when mixing on headphones it is still easy to get sidetracked towards making a mix that is too bright or too dull – especially if the first sounds introduced to the mix are too bright or too dull and the rest of the mix is built around them. How do we keep ourselves on track? This is where the 6dB guide can be helpful…
Many EQ plug-ins offer a spectrum analyser, and some of those spectrum analysers offer a ‘6dB guide’. This appears as a diagonal line beginning at 0dB at 1kHz and descending downwards at a rate of -6dB/octave as the frequency gets higher.
If we listen to a number of well-engineered recordings while studying how their frequency spectrums compare to the 6dB guide, we’ll notice an interesting trend. Mixes that sound like they have a good balance of energy throughout the frequency spectrum tend to conform to the 6dB guide, as do direct-to-stereo purist recordings of acoustic music that are made with ‘accurate’ microphones (ie. those with a flat frequency response) and that are often described as sounding ‘natural’ or ‘pure’. Meanwhile, mixes that sound excessively bright will rise noticeably above the 6dB guide line, and mixes that sound excessively dull with fall noticeably below the 6dB guide line.
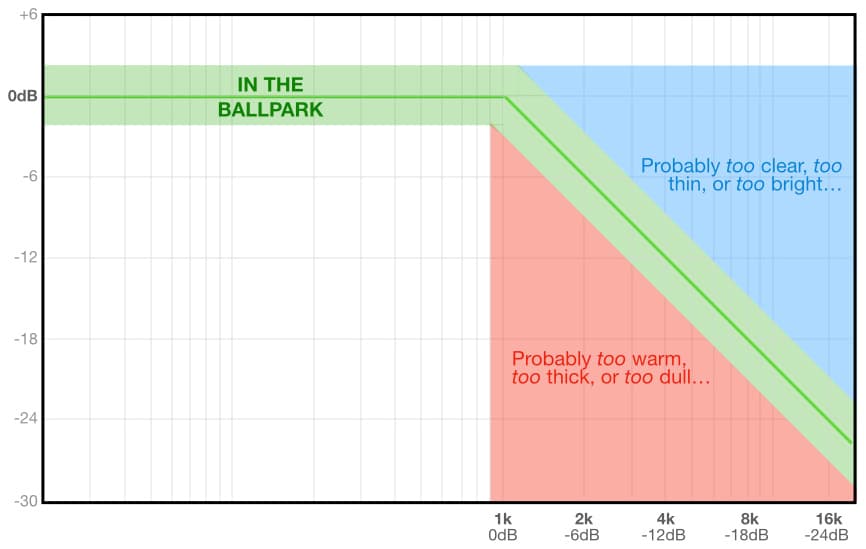
Conforming to the 6dB guide does not guarantee that a mix has a good frequency balance, but it does offer a good point of reference – especially if used in conjunction with your musical reference track (see below).
Frequency Response Tools You Don’t Need
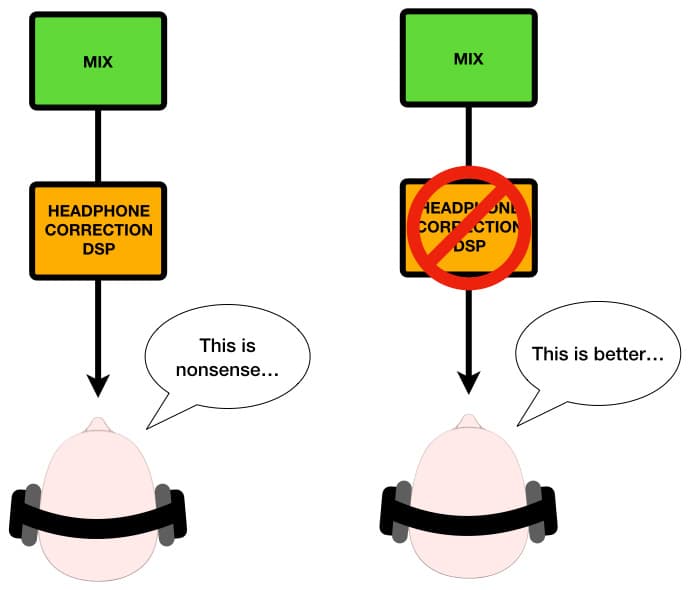
There are currently a number of devices and apps on the market that use DSP to ‘correct’ the frequency response and other sonic characteristics of numerous headphones. The idea is simple: enter the make and model of the headphones into the app and – assuming the manufacturer has already created a profile for those headphones – a compensating process will be inserted into the listening path to make the headphones sound ‘right’, or perhaps even make them sound like more expensive headphones.
At best, such listening tools are just one more thing in the monitoring path affecting our decision making. The idea of monitoring equalisation and DSP correction has validity in the sound reinforcement world and also debatably in the recording studio world, which are both cases where room acoustics issues can be compensated for. As we’ve previously established, room acoustics problems don’t exist with headphones. It’s reasonable to assume that long-established professional headphone manufacturers like AKG, BeyerDynamic, Sennheiser (which also owns Neumann) et al know what they’re doing. Their contemporary headphones reflect decades of refinement as detailed in the previous instalment of this series, and shouldn’t need any compensation.
It’s also worth remembering the difference between listening with headphones and mixing with headphones. This important difference is often overlooked by engineers when choosing headphones. As with choosing studio monitors, it is not enough to simply listen to how well they reproduce music – the real test is how well they help us make good mixes. What they reveal about our mix decisions is more important than how much enjoyment they offer. Most of the DSP-based headphone correction tools are intended to provide an improved listening experience for audiophiles, not create a more revealing mixing environment. Any headphones that need equalisation to make them suitable for mixing are the wrong choice to begin with.
An interesting tool that sits somewhere between the 6dB guide mentioned earlier and the ‘correction’ equalisation mentioned above is one that performs a spectral analysis of our mix, compares it to the typical frequency spectrum of reference mixes of the same genre, and advises which parts of the mix’s spectrum need more or less energy when compared to the spectrums of the references. This is a very useful tool for people mixing on affordable nearfield monitors that don’t reliably reproduce much below 80Hz and who are working in rooms without much acoustic design or treatment, and are therefore literally ‘flying blind’ when working with low frequencies. However, with good headphones and an appropriate reference track for the genre (as discussed in ‘Reference Tracks’, below) this type of tool shouldn’t be necessary because, from a spectral point of view, headphones voiced to the Harman target or similar provide a situation where we can trust what we’re hearing.
PHASE & INTERAURAL CROSSTALK
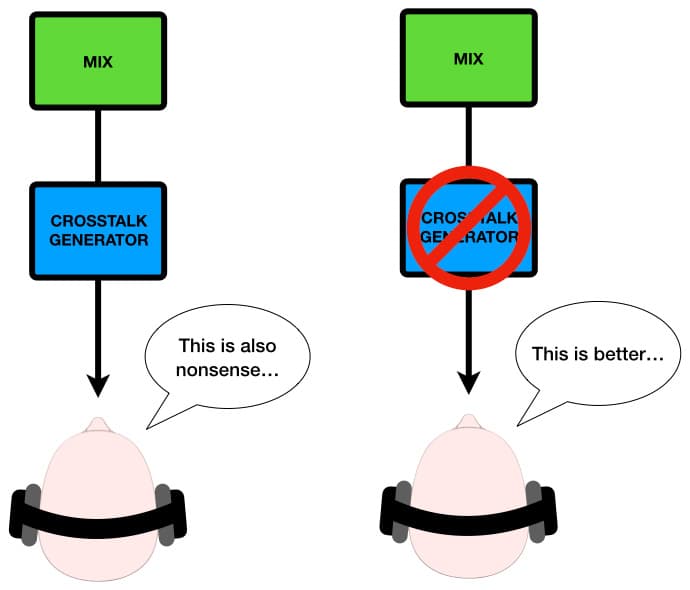
Since the beginning of stereo headphone listening there have been crosstalk generators: circuits and algorithms that attempt to recreate the sensation of speaker listening by introducing interaural crosstalk to headphone listening. Their mere existence confirms what we’ve already seen throughout this series: speaker listening adds a number of variables that don’t exist with headphone listening. As we also saw in the previous instalment, compensating for those variables makes our mixes more resilient and thereby offers better translation across a wider range of playback systems. If we’re trying to re-introduce those variables to our mixes in order to compensate for them, it makes sense to use a crosstalk generator in our monitoring path.
Or does it?
No. For our purposes we’re not interested in the interaural crosstalk itself – we’re interested in the affect it has on our mixing decisions. We can find that out by using a goniometer and a mono switch…
Goniometer & Phase Correlation
The goniometer provides a visual indication of polarity and phase differences between the left and right channels of a stereo mix, hence it is often referred to as a phase scope, a phase meter or a phase correlation meter – although the latter term usually refers to a much simpler meter that has a linear scale from -1 to +1, as shown below:
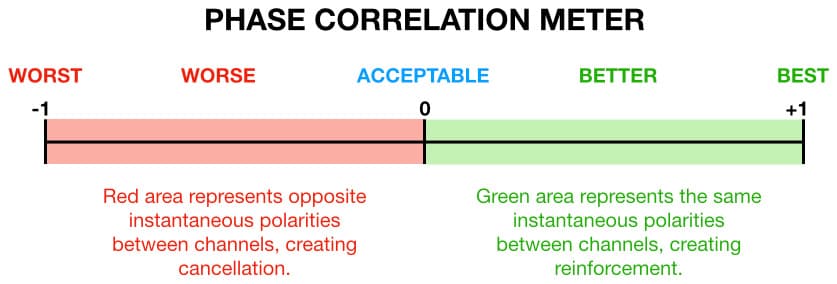
If the correlation indicator spends a lot of time between -1 and zero it means there are serious phase and/or polarity issues in the mix; those sorts of problems would probably be audible in speaker listening (due to interaural crosstalk) but can be very hard to notice in headphones.
The phase correlation meter shown above is almost but not quite as helpful as the goniometer for our purposes: it shows the total correlation of the left and right channel signals, but its one-dimensional display and slower weighting prevents us from easily seeing into the mix and finding out which individual signals are correlating and which signals are not. So we’re back to the goniometer, which moves fast enough and in enough dimensions for us to identify individual sounds within the mix.
A small dot, typically green or blue (a nod to the cathode ray screens used in early goniometers), is moved around the screen using the instantaneous magnitudes and polarities of the left and right audio signals as rectangular coordinates – rather like a high speed game of Battleship but where ‘0,0’ is the centre of the board. The rapidly moving dot leaves a momentary trail of light, or trace, behind it that is sometimes referred to as a ‘Lissajous figure’ or ‘Lissajous curve’. It provides helpful insights into the instantaneous polarity and phase relationships of the left and right channels of our mix and how they might interact due to interaural crosstalk, but only if we know how to interpret it. Here’s how…
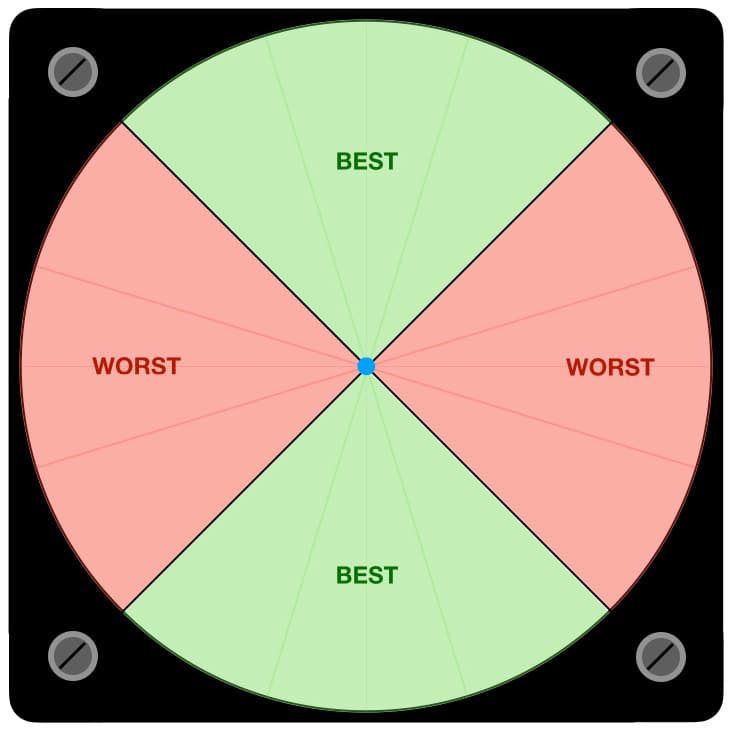
The goniometer’s display is divided into four equal-sized quarters, or ‘quadrants’, as shown above. The top and bottom quadrants (shaded in green) represent points in the mix when the two channels have the same polarity and will combine constructively – in other words, if we added their amplitudes together the resulting magnitude will be higher than the highest of the two individual channel magnitudes at that point in time. When the trace (represented here as a blue dot in the centre) is in either of these quadrants it means both channels are simultaneously pushing the signal towards us or pulling it away from us, working together to create a very stable phantom image with better impact.
The side quadrants (shaded in red) represent moments in the mix when the two channels have opposing polarities and will combine destructively – in other words, if we added their amplitudes together the resulting magnitude will be lower than the highest of the two individual channel magnitudes at that point in time. When the trace is in either of these quadrants it means one channel of the stereo mix is pushing the signal towards us while the other channel is pulling it away from us, resulting in a vague phantom image without much impact.
When the dot ventures into either of the side quadrants it means there is an instantaneous polarity difference between the two channels due to either a polarity difference or a significant phase difference between two or more sounds within the mix. That’s exactly the kind of problem we need the goniometer to expose because it is difficult to identify when mixing in headphones but is readily noticeable when heard through speakers – assuming we know what to listen for. If a significant portion of the mix ventures into the side quadrants of the goniometer we should check the mix in mono through headphones or through a stereo speaker system; if there is a clearly audible problem in mono then we need to find the cause and fix it.
Note that many reverberation and similar stereo time-based effects will create phase and polarity differences between channels as part of their effect, and in these cases it is up to us to decide if it’s a problem or not. If we mute and un-mute the effect repeatedly while watching the goniometer we should be able to identify what is going on and decide whether it’s a problem or not.
The illustration below shows a number of goniometer displays and what they mean…
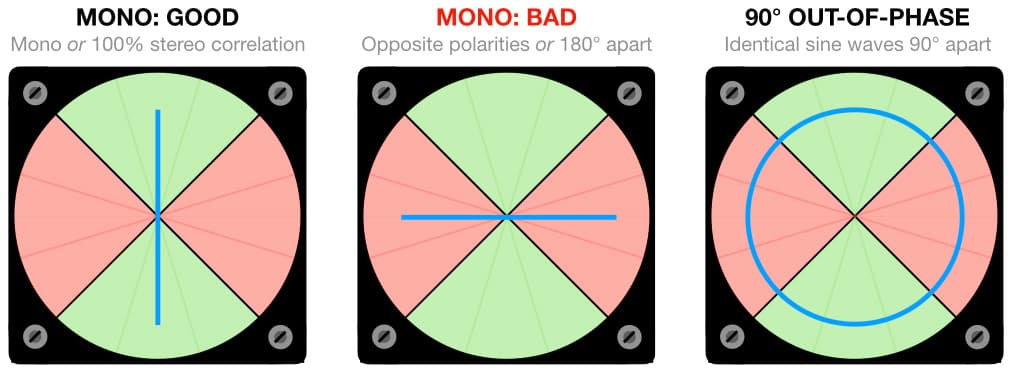
If we spend enough time observing different professionally mixed and mastered recordings on the goniometer while listening through speakers, we will notice an interesting trend. Mixes that stay mostly in the upper and lower quadrants will tend to sound clean and solid due to their good stereo correlation (where both channels are reinforcing each other), and will probably not change significantly when summed to mono. Mixes that have a lot of information in the side quadrants will tend to sound messy and vague due to their low stereo correlation (where the channels are diminishing each other), and will change significantly when summed to mono. [The descriptive terms given above may seem over-dramatic, but they will make sense to anyone who has spent enough time watching a goniometer while listening to many different recordings: mixes with good stereo correlation leave a different sonic fingerprint than mixes with poor stereo correlation.]
The top quadrant of the goniometer also serves as a panning meter, as shown below. A single mono sound source panned hard left will appear as a diagonal line from the upper left to the lower right of the screen. Conversely, a single mono sound panned hard right will appear as a diagonal line from the lower left to the upper right of the screen. A sound panned to the centre will be a vertical line from top to bottom. If you pan a mono sound source from left to right, you should see a single straight line rotating from hard left (45° left of centre) to hard right (45° right of centre) on the goniometer.
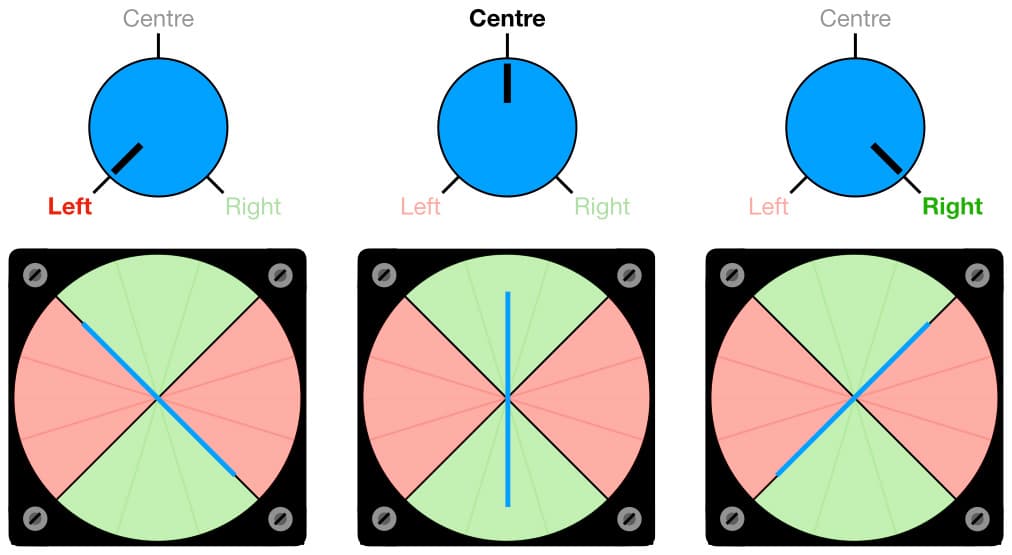
When mixing, it is always worthwhile soloing the individual tracks/channels and checking them on the goniometer. If all of the individual sounds (mono or stereo) stay within the upper and lower quadrants, and the only things that enter the side quadrants are spatial effects like reverberation, room mics and similar that rely on phase differences or arrival time differences between channels to create their effect, your mix is probably going to translate well to speakers and other headphone systems.
The goniometer is particularly helpful when setting up drum overheads using two widely spaced microphones. If you solo the overhead mics (while panned hard left and hard right) and alter the spacing of the two microphones just enough to reduce the amount of signal getting into the side quadrants, the overall drum mix will benefit when heard through speakers or summed to mono because the overheads are reinforcing the overall drum sound rather than diminishing it.
Mono Switch
The mono switch can be very helpful for making a ‘worst case’ version of your mix and highlight (if not exaggerate) any interaural crosstalk problems that might exist when the mix is heard through speakers.
Most mixing consoles – whether hardware or software – include a mono switch that sums the stereo bus to mono. If not, it will be available on a plug-in that you can insert over the stereo mix bus and switch on and off as desired.
DESKTOP MONITORS
Throughout this series we’ve discussed how to mix on headphones and thereby avoid the need for big studio monitors and the acoustic treatments required to make the most of them. We’ve discussed the ‘variable compensations’ that intrinsically happen when mixing on speakers but not when mixing on headphones, and we’ve discussed ways of emulating and/or building them into our headphone mixes.
If we really want to make ‘market relevant’ headphone mixes that also translate well to speaker playback, it makes sense to have some speakers in our monitoring chain as a cross-referencing tool. They don’t need to be expensive big monitors with a flat frequency response and good low frequency extension, and they don’t need to be super accurate – headphones easily satisfy all of those requirements at a fraction of the price of big monitors and their associated room acoustic treatments. The main things the desktop monitors need to do are reveal how the individual sounds in our mix will interact with each other when combined in the air, while also confirming panning decisions, and helping us to find the right balance for reverbs and other spatial effects that are difficult to judge in headphones. This means the main requirement for the desktop monitors is to image well, and few speakers image as well as single wide-range drivers in small enclosures such as those offered by Auratone, Grover Notting et al…
When configured in an equilateral triangle with the listener, as detailed in the previous instalment, and with an appropriate absorptive material on our work surface to minimise comb filtering due to first order reflections off the work surface, these small speakers can provide a remarkably useful spatial reference for checking panning, reverberation levels and other spatial decisions that are difficult to judge on headphones. In essence, they fill in the gaps between headphone mixing and speaker mixing without resorting to expensive big monitors and the room acoustic treatments that are inevitably required to make the most of them.
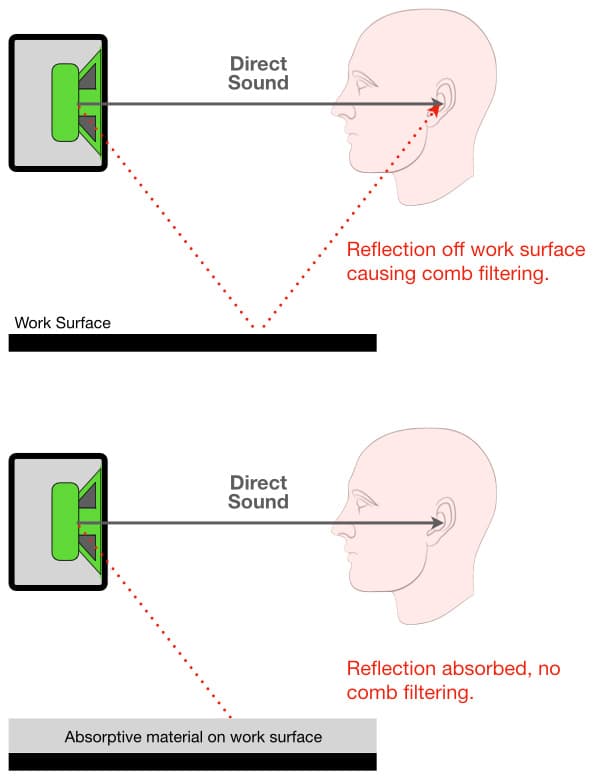
It would be great if we could use the speakers built into our laptops or tablets for this purpose, but those speakers cannot be trusted for panning and spatial decisions. Contemporary mobile devices have remarkably good sound quality for their size, but their internal speaker systems often include built-in spatial processing that’s designed to ‘throw’ the stereo image wider than the device itself. This allows built-in speakers that are typically less than 30cm apart to create a stereo soundstage that spreads to about 55cm apart (ie. about ±30° wide for the listener, as required for stereo speaker listening) when the user is at a typical viewing/working distance from the screen. It does this using clever manipulations of the stereo signal to fool the listener into perceiving a wider soundstage than seems possible under the circumstances. This spatial processing provides an impressive speaker listening experience for music and movies, but we cannot trust it for speaker mixing because it is exaggerating every panning and spatial decision we make to suit the device’s specific speaker placements and its specific spatial processing, which means there is no guarantee that our panning and spatial decisions will translate well to other systems. No matter how familiar we are with the tonality of our portable device’s sound, things get very different when we try to make spatial decisions with it because some things will be exaggerated and thereby mislead us to under-compensate, and other things will be downplayed and thereby mislead us to over-compensate.
This brings us back to a small pair of single-driver desktop monitors that take up little space on the desk and are not intended to be anything other than spatial cross-referencing monitors. That’s what we need…
REFERENCE TRACKS
There are two reference tracks we should have for every headphone mix.
The first is a stereo imaging test, the sort that’s widely available for testing hi-fi systems and can be found on-line and on every audiophile test disc ever made [Google ‘stereo imaging test’]. Ideally it will have tone bursts or dialogue panned to specific locations within the stereo mix. Listening to this allows us to ‘settle in’ to the stereo soundstage we’re working within, identifying the locations of the five most important reference points – hard left, mid-left, centre, mid-right, and hard right – and familiarising ourselves with where those locations appear in the soundstage created by our chosen headphones.
As discussed in the previous instalment, we know that wherever hard left appears in our headphones will appear at 30° left-of-centre when heard on speakers, and wherever hard right appears in our headphones will appear at 30° right-of-centre when heard on speakers. This allows us to create a ‘panning map’ of where things should be panned in the headphones based on where we want them to appear when/if heard on speakers.
The second reference track is a musical reference for perspective. This should be a well-engineered recording of a similar style, genre, balance or production as the mix we’re preparing to make. Note here that ‘well-engineered’ actually means ‘well-engineered’ – in other words, something that has been well-recorded, well-mixed and well-mastered. Just because you like it doesn’t mean it is well-engineered; neither does its commercial success or how many awards it has won. If you can hear all of the sounds in the mix clearly at all times, it has probably been recorded, mixed and mastered well. If the vocal and solo performances are the only sounds that can be clearly heard at the times they occur during the mix, you’re listening to a poorly engineered mix that’s been cleverly mastered to keep the listener’s attention focused on the main instruments and away from the poor mix taking place behind them. In professional audio parlance this is known as a ‘polished turd’; mixes like this keep a lot of mastering engineers and multi-band compressor manufacturers/developers in business, but are never good references…
There are recordings in every genre that are considered ‘well-engineered’, and there are recordings from similar genres that are close enough aesthetically (ie. similar tonalities and balances of individual sound sources, and similar use of effects) to serve as references. As we’ll see later, this reference is something we will be regularly comparing our mix-in-progress against to make sure we are remaining within the tonal and spatial ballpark of the genre’s aesthetic. Hopefully our finished mixes should not require too much corrective work in mastering, thereby freeing up more time for the creative aspects of mastering.
This allows us to create a panning map…
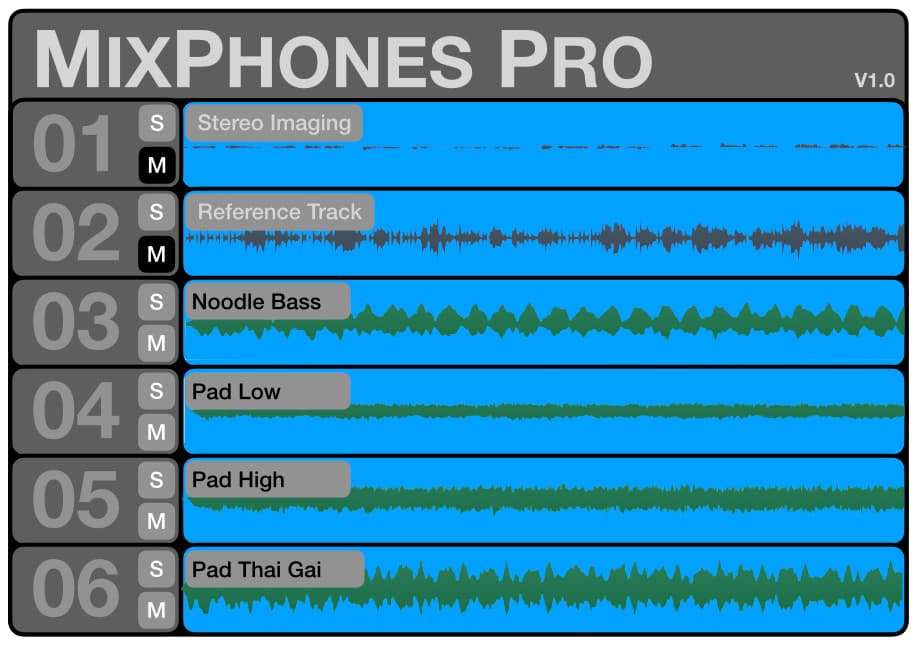
MIXING WITH HEADPHONES TEMPLATE
Now that we have our headphone mixing essentials together – good headphones, a goniometer, mono switching, a spectrum analyser with 6dB guide, a stereo imaging reference track, a musical genre reference track, and hopefully a pair of small desktop monitors as described earlier – we need to create a ‘Mixing With Headphones’ template session that we can use for all of our headphone mixing.
This is essentially an ‘empty’ session file with everything we need in place, so that all we have to do is load the tracks and start mixing – unless we decide to record our session directly into the template.
We’ll start by setting up a channel strip that we can duplicate as often as we need. We need to configure the channel strip as shown below, with three EQ plug-ins and one compressor plug-in. We will set up the channel strip following the traditional analogue studio approach: plug-ins that create a replacement of the original signal (eg. EQ and compression) are inserted directly into the channel strip, while plug-ins that create something that needs to be mixed with the original signal (eg. delays, echoes and reverberation) are connected via auxiliary sends and brought back into the mix through their own channels where we can EQ them and/or send them to other effects if desired.
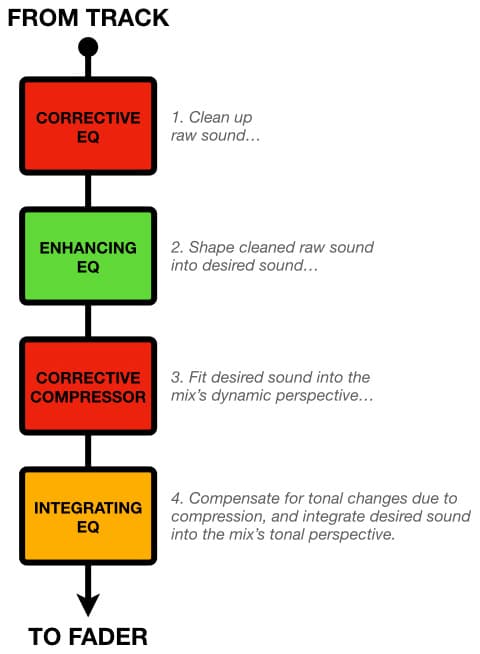
The first plug-in is a corrective EQ that is there to clean up any sounds before further processing them. It should be a clean EQ that is not intended to impart any tonality or character of its own on the sound. The emphasis here is an EQ that is capable and versatile rather than euphonic. A four-band fully parametric EQ with high and low pass filtering and the option to switch the lowest and highest bands to shelving is a good choice here.
The second plug-in is an enhancing EQ that we will use to ‘create’ the sound we want. This can be an EQ with character to introduce some euphonics into the sound if desired, and it is absolutely okay to start off with the same ‘character’ EQ in every channel strip. Remember, all of the famous analogue mixing consoles throughout history offered their own EQ and it was the same in every channel strip. That didn’t stop anyone from making great records that are still revered today, so don’t get too hung up about having lots of different EQ plug-in options. Leave that distracting bullshit on Youtube where it belongs and get the mix started. You can change the EQ plug-in later if desired, just as we did in the analogue studio world where we would track on a Neve to get that warm musical Neve sound and then mix on an SSL to add that big and macho SSL sound: the best of both worlds, but with only two EQs overall (Neve for tracking, SSL for mixing). “I love the sound of that combination of different EQs, that’s why I bought this record”, said nobody ever — except for sound engineers, recording musicians, and their too-old-for-trainsets Youtubey ilk.
The third plug-in is a corrective compressor, the sort that has controls for threshold, ratio, attack and release times, and an output level control. As with the corrective EQ, we don’t want something that’s going to add any particular character. We can swap it for something different during the mix if necessary, but to get the mix started we just need something to get the track’s dynamics under control in a predictable manner.
The fourth plug-in is an integrating EQ. It’s job is to help us integrate the sound from the channel strip into the mix’s tonal perspective, and should be a similar choice as the first EQ because its job is corrective. The detailed application of these four plug-ins will be explained in the following instalment.
Now that we’ve got the channel plug-ins sorted, we need to get the required metering and monitoring capabilities in place over the mix bus. We want to start with a mono switch, which might be available within the DAW. Ideally, all of the other metering tools will be placed after the mono switch so that we can see the effect of the mono switch in the metering, rather than just hearing it. We also need a goniometer, a spectrum analyser with 6dB guide, and bus metering that shows levels with LUFS and dBTP.
Insert the mono switch (if there isn’t already one in place on the stereo bus of your mixing console or DAW), the goniometer, the spectrum analyser with 6dB guide and the metering over the stereo mix bus where they are constantly monitoring whatever we’re hearing. They’ll show us the mix when we’re mixing, and they’ll show us individual tracks when we’re soloing.
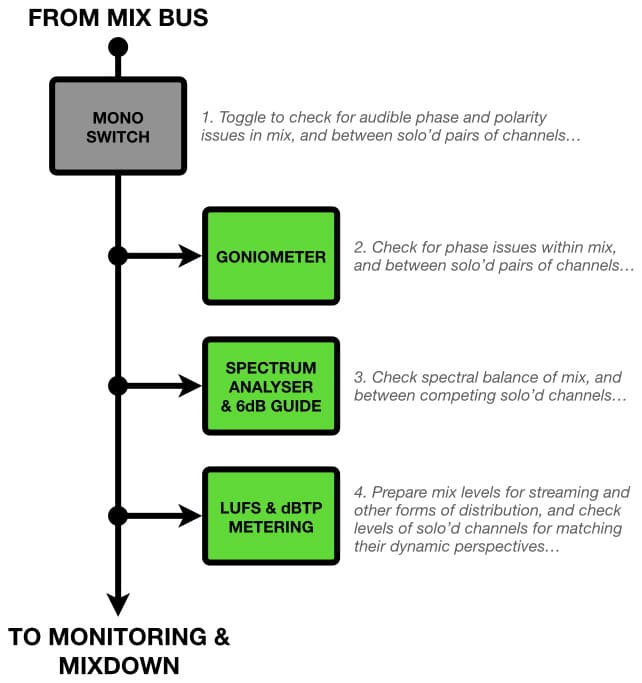
iZotope’s Ozone has always been a good choice for this type of stereo mix bus metering/monitoring because it contains a goniometer, a spectrum analyser with a 6dB guide, mono switching, and excellent level metering capabilities. Most of these metering tools will work even if the processing is bypassed or switched off, meaning they are just metering tools and won’t have any impact on our mixes unless we want them to. Other plug-in manufacturers make goniometers, stereo/mono switches and spectrum analysers with 6dB guides, so if you don’t have Ozone – or don’t like how much screen space it consumes – rifle through your arsenal of plug-ins to see what’s there.
Load your reference tracks into the top tracks of your DAW. (If they have a different sampling rate than your mix you will need to run them through a sample rate conversion before loading them into the session.) These are both stereo signals and each will therefore require a stereo track (or two mono tracks panned hard left and hard right) from your DAW. Load the stereo imaging track into the first stereo track of the mixing template, and the musical reference track into the second stereo track of the mixing template. Using clip gain or a gain plug-in, adjust the individual levels of these references tracks so that when their faders are at 0dB each track’s metered level is sitting at or around your mixing reference level on the stereo mix bus (typically -20dBFS or 0dBVU) when solo’d and should therefore be at your calibrated monitoring level of around 80dB SPL (assuming you are monitoring at your calibrated level as described in the previous instalment).
These tracks should be the first things you listen to before starting the mix – one after the other – and will acclimatise your listening to the imaging of your headphones, how they reproduce the desired tonality of the mix, and how loud you should be working. After those initial listens, these tracks will stay muted during your mixing session but will always be ready to cross-reference with a press of the return key, a touch of the solo button and perhaps a bit of fiddling with the mute key.
BRING IT ON…
With the ‘Mixing With Headphones’ template we have ready access to a stereo imaging reference track for determining where panned images should appear in our headphones, and a musical reference track for checking how our mix decisions compare to a known and relevant reference. We also have the goniometer to show which parts of our mix might sound weird when heard through speakers, a mono switch to check if problems seen on the goniometer will result in any audible effect, and the 6dB guide to keep us from wandering too far from the acceptable mix tonality track. We can now load all of our audio tracks into the session template – if they’re not already there – and start mixing.
In the next instalment of this series we’ll look at some important considerations for mixing with headphones, along with mixing procedures and techniques that will help to land our mixes within five minutes of mastering…
IMPEDANCE, POWER, SENSITIVITY & SPL
The headphones’ sensitivity tells us how much SPL they will generate for a given amount of power from the amplifier; more power into the headphones means more SPL out of the headphones. However, contrary to popular assumption, we cannot force power into headphones (or any other electrical circuit, for that matter). An amplifier’s power rating only tells us how much power it is able to provide; it is up to the load (speaker, headphones, whatever) to take the power it needs from the amplifier – up to the maximum the amplifier can provide. [Things start going wrong when the load tries to take more power than the amplifier can provide, which is like forcing one horse to pull a cart that requires two horses. More about that later…]
When it comes to headphones, the power provided by the amplifier into the headphones is the product of the voltage at the output of the amplifier and the current drawn from the amplifier by the headphones – which is determined by their impedance. The relationship between current, voltage and impedance is shown in the formula below, which has been adapted from Ohm’s Law and modified to apply to headphones.
I = V / Z
Where V is the signal voltage at the output of the amplifier in Volts RMS, Z is the impedance of the headphones in Ohms, and I is the current that the headphones will draw from the headphone amplifier in Amps RMS.
From this formula we can see that for any given voltage (V), reducing the impedance (Z) increases the current (I).
The following formula shows how the voltage presented by the amplifier, and the resulting current drawn from the amplifier by the headphones, collectively determine the electrical power used by the headphones:
P = V x I
Where P is the power consumed by the headphones in Watts Continuous, V is the voltage at the output of the amplifier in Volts RMS, and I is the current drawn by the headphones in Amps RMS.
From this formula we can see that there are two ways to increase the power consumed by the headphones: one is to increase the voltage, the other is to increase the current. With low voltage battery-powered devices there is a limit to how high we can increase the voltage (ie. the battery voltage is the maximum available without resorting to voltage multiplier circuits); beyond that, we have to increase the current. The only way we can increase the current under these circumstances is to lower the impedance of the headphones, because I = V / Z.
As the formulae above show, for any given voltage, a lower headphone impedance draws more current and therefore takes more power from the amplifier. With a bit of mathematical substitution and transposition, we can summarise the above formulae and explanations with the following formula:
P = V2 / Z
Where P is the power in Watts Continuous, V is the voltage in Volts RMS, and Z is the impedance in Ohms. This formula makes it clear to see that, for any given voltage (V) coming out of the amplifier, lowering the impedance of the headphones (Z) results in more power (P).
The headphones’ sensitivity tells us how efficiently they will convert the power they take from the amplifier into SPL. There are two ways a headphone manufacturer can specify sensitivity. One way is to express it as SPL for a given power, such as 100dB/mW, which means 1mW (0.001W) of power will produce an SPL of 100dB. The other way is to express it as SPL for a given voltage, such as 100dB/V, which means if 1V RMS was applied to the headphones they would produce an SPL of 100dB (assuming the amplifier can provide sufficient current). If we know the appropriate electrical and decibel formulae we can easily convert between the two different types of sensitivity ratings; thankfully we don’t need to do that for the purposes of this discussion.
In low voltage situations such as the headphone sockets in battery-powered devices, lower impedance and higher sensitivity are both desirable traits for headphones. The lower impedance results in more electrical power going into the headphones, and the higher sensitivity results in more SPL coming out of the headphones.
Headphones with low sensitivity and high impedance are the most difficult to drive to useful SPLs when working with low voltage battery-powered devices. The result is, at best, insufficient SPL. It is also common in this situation to experience reduced low frequency reproduction (low frequencies contain the most energy and therefore require the most power, and the low-voltage headphone amplifier cannot provide it), causing us to compensate by adding too much low frequency energy to the mix. In extreme situations the sound from the headphones will feel ‘restrained’ and ‘compressed’, particularly in the low frequencies, and in worst-case scenarios it will be distorted. If you’re experiencing these situations when using a laptop’s headphone socket it means your headphones’ impedance is too high and/or their sensitivity is too low; in either case, the headphones require more power than the amplifier is able to provide. You’re going to need an external amplifier (eg. one that is built into an interface, or a dedicated headphone amplifier) or switch to headphones with higher sensitivity and/or lower impedance.
Although there is no clearly defined threshold between low impedance and high impedance values for headphones, Apple (the most used brand of headphones in the USA at the time of this writing) provides a useful reference based around a threshold of 150 ohms. They have been addressing the ‘high impedance headphone problem’ in their laptops and desktops since 2021, using an adaptive headphone amplifier circuit that senses the impedance of the connected headphones and adjusts the signal voltage accordingly (up to 1.25V RMS for impedances lower than 150 ohms, and up to 3V RMS for impedances above 150 ohms). Among other things, this should alleviate the need for an external headphone amplifier or interface when mixing on-the-go using high impedance headphones with Macbook Pro and Macbook Air laptops. That’s one less thing to carry around, connect, and balance on our laps. Winner, winner, chicken dinner…
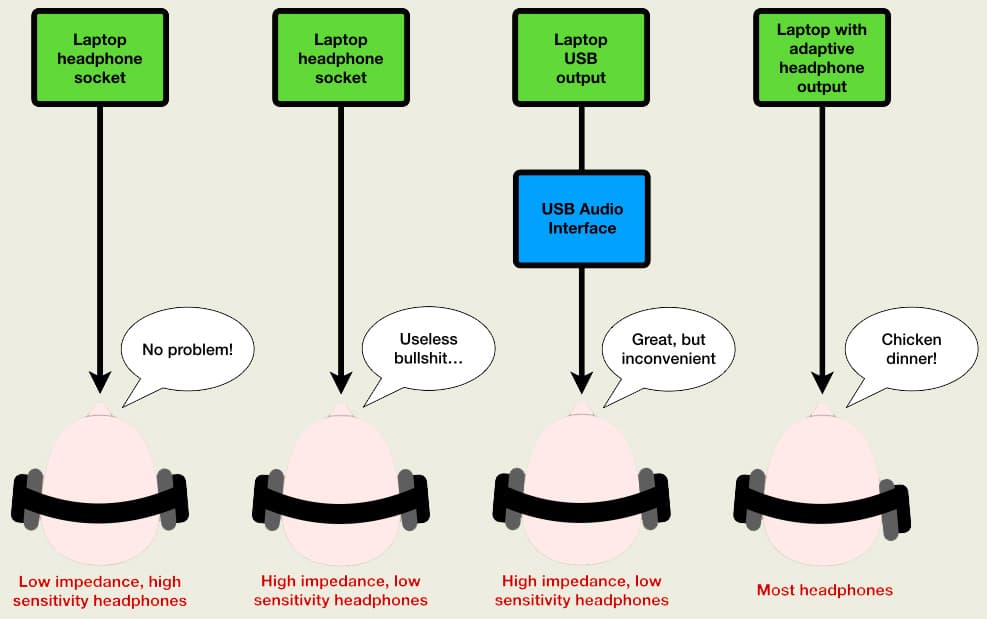
In a strange but reassuring twist, the company that led the way in removing headphone sockets from smart phones (where the physical freedom of a wireless connection makes sense for commuters) is leading the way with headphone amplifiers in their laptops and desktops (where the codec-free sound quality and zero latency of a wired connection makes sense for creators).











Thanks for the great series! Do you have any suggestions for the stereo imaging test and for the spectrum meter with the ‘6dB guide’?